2.10.2015

A Hippo Birdie To You!

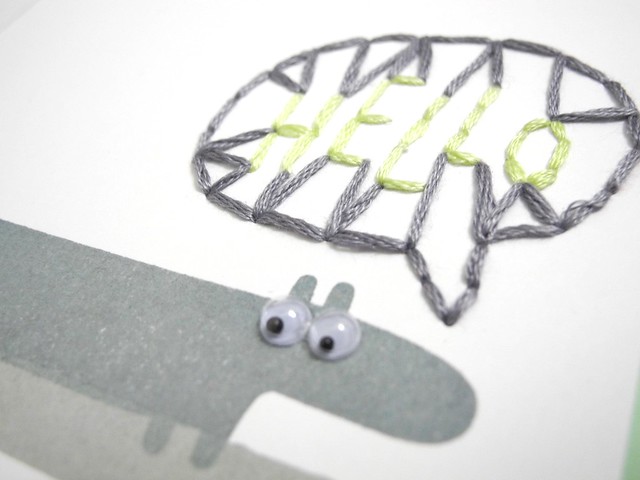
Yup. That's adorable. And punny. And you know how much I enjoy a quality pun. Or a lesser quality pun, at that! HA! Over the weekend I pulled out this slightly older Avery Elle stamp set to play. You know... just for fun! WHAT?! Yup. I totally did that.

Hippo Birdie


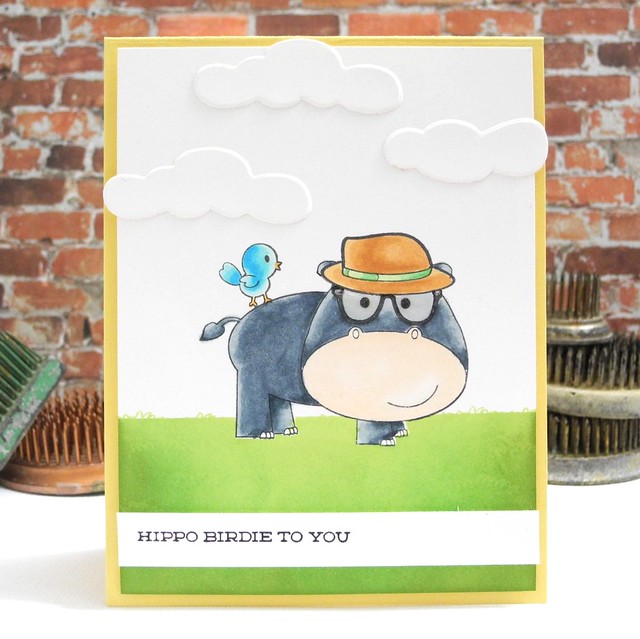
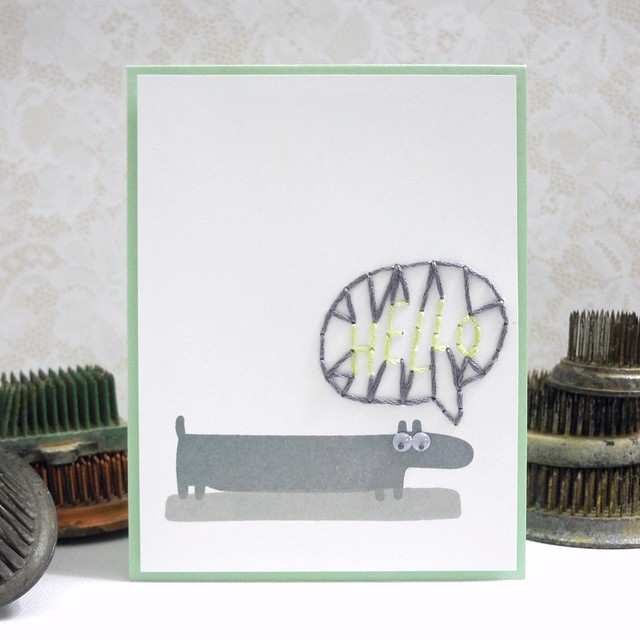
Oh, my LOU, this was fun to do, you guys! For reals, though! So, this is a whole lot of one layer stamping and inking. The very first thing I stamped? The hat. No. For reals. I stamped the hat and then masked it to stamp the hippo and then added the glasses with the hat mask still on. I then removed the hat mask and colored the image in all of it's adorableness. You GUYS! It's a little hipster hippo! WITH A BIRDIE! I can't even....

Hippo Birdie (detail)


I used Wink of Stella over the Spectrum Noirs to add a bit of sparkle to the birdie and then used Glossy Accents on the glasses because, well, glasses. I then created a mask of the bottom of the hippo and layered that with a straight edged mask to ink the grass. I used a few colors of ink from Simon Says Stamp and Ranger Distress inks. Finally, I added some adorable die cut clouds from Spellbinders to finish off the fluffy cute sky! Yup. Fluffy cute. It's a thing. It's a thing now, anyway.

I am linking this fun little card up to the Avery Elle Masking Challenge!

Have a Happy!

2.09.2015

With All My Love

You know when you get a new product in the mail and all of the sudden have ALL KINDS of fun ideas on how to use it? Well, that is just exactly how I felt when the Tic Tac Toe Fri-Die from CAS-ual Fridays Stamps arrived in my happy little studio! Today is my day over on the CAS-ual Fridays Stamps blog and I created this fun card to share with you!

With All My Love


Instead of using the die as an actual tic tac toe board, I decided to use the grid to cut quilt squares from some gorgeous patterned papers from Crate Paper. I die cut several different patterns and then used one of the grids as the guide for adhering the squares. The gold glitter heart is die cut using one of the 'pieces' dies in the set. LOVE IT!

With All My Love (detail)


I stamped the 'With All My Love' with Pale Tomato ink from Hero Arts and then overstamped the 'love' with Smokey Grey VersaFine. These colors worked SO well with these patterned papers! I love it when that happens!

Be sure to head on over to the CAS-ual Fridays Stamps blog to check out the inspiration you will find there. There girls knock my socks off! Well, not literally. That would be weird. But they are really good at what they do. For reals.

Have a Happy!

2.08.2015

Dressing Up Notebooks with Spellbinders

I love Moleskines. It's sort of an obsession, actually. They are just wonderful little notebooks that are incredibly useful and come in all kinds of sizes and paper types and they just make me happy. That being said...I may have a few more around than one might actually 'need', so to speak. Not that that ever happens. HA! Well, today I have a super fun post over on the Spellbinders blog showing you how to add some pizzaz to your little notebooks making them even prettier AND even better gifts. Be warned, however, when you finish one to give as a gift you will want to keep it, so just go ahead and make two. K? K. Glad we had this talk.

The Best is Yet to Come


I created this one after creating the one over on the Spellbinders blog. This is a much more simplistic version and I think I may like the other better, but, the simple truth is... I love them both. For reals. SO...that means you need to head on over to the Spellbinders blog to check out the one I made there along with the FULL tutorial on how to create a similar look! I think you will like this one! For reals, though!

Notebook Step 2


Here is a little sneak at the work that goes into the one you will see over there. Be sure to check it out and leave some love over on the Spellbinders blog!

Have a Happy!

2.05.2015

Because They Don't All Work

Okay, so, here's the deal. I love this card. I seriously do. BUT, it is not what I set out for it to be. You see, I attempted to use a super fun technique that Jennifer McGuire taught in the Online Card Classes Clean and Simple 4 class, however, that technique refused to work for me. I plan to try it again, but I was bound and determined to finish this card, so I did, nonetheless. I did incorporate a lot of inking on this one to create my own colored backgrounds, and I sort of love it.

Brightest Star


First of all, HOW CUTE IS SHE?! Seriously. I am in love with this adorable Shooting Star stamp set from Mama Elephant! It makes me smile! YAY! I stamped her first, and then colored with Spectrum Noir pens. I then stamped her on some Post-it tape and masked  her off to do the inking. I used Simon Says Stamp inks on Crafter's Companion Ultra Smooth cardstock. I LOVE how the inking blended so beautifully and that this is essentially all one layer!

Brightest Star (detail)


I attempted to use VersaMark over the inked background to have the ink create a cool shadow look for the stars. That's the part that didn't work. BUT, I decided to simply stamp and heat emboss the stars with white powder and I think it looks awesome, so I am happy with it. YAY!

I hope you like her!

Have a Happy!

2.04.2015

All Things Bright And Beautiful


All Things Bright and Beautiful! That's the theme for the Simon Says Stamp Wednesday Challenge this week! Yup. We're pretty darned sick of winter and thought that this would be a great time to BRIGHTEN things up by using bright, happy, beautiful colors in our projects! The Design Team is featuring Hero Arts products this week. You don't have to use them to play along, but we would love to see you rock them if you have some on hand!

Out of this World

I figured with a challenge to use bright colors it just made sense to pull out the BRIGHTEST colors I have! I used my Hero Arts neon inks for this fun card, and... yup. It's BRIGHT! LOL! I stamped the background in pink by inking only part of the stamp and then used my favorite WPlus9 tag die to create a simple tag with more bright colors.

Out of this world (detail)

You can find my complete supply list below. Now it's YOUR turn! Create something BRIGHT and BEAUTIFUL (something NEW, please) for the challenge and link it up over on the Simon Says Stamp Wednesday Challenge blog! You can enter up to five NEW projects and one lucky participant will win a $50 Voucher to the Simon Says Stamp Store! WHAT?! Yup. Totally, you guys. For reals.


Here are the supplies I used for my card. These are affiliate links and your support is, as always, appreciated!

Cardstock: Simon Says Stamp Black Cardstock, Crafter's Companion Ultra Smooth White
Ink: Hero Arts Neon Ink, VersaMark
Stamps: Hero Arts Tiny Flags Background Stamp, Hero Arts Shoot for the Moon
Die: WPlus9 Timeless Tags 2
String: May Arts Metallic String
Embossing Powder: Stampendous!
Foam Tape: Scotch (Giant Roll - totally worth it!)
Tool: Milwaukee Heat Gun (I love that thing. With all of my heart.)


2.03.2015

A Stitchy Hello

I have a quick post today sharing a card I created using another fun technique from Online Card Classes Clean and Simple 4. Jennifer McGuire shared some tips on stitching to add texture. She used stamps and dies as her guide, but I had a fun stitching guide on hand that I haven't used in awhile, so I pulled that out again to play!

DSCN7121


I stamped the critter from the new Waffle Flower Crafts On My Mark stamp set along with his shadow in grey toned inks from Simon Says Stamp. I then used the We R Memory Keepers stitch guide for the hello. Instead of following the simple outline, as suggested by the pattern, I created a unique design with the stitching and had some fun with it. I love how it turned out!

Hello (detail)


I added a couple of googly eyes for a playful feel and mounted the panel on a mint cardstock base to tie in the mint in the sentiment. This came together rather quickly and was a lot of fun to create!

Have a Happy!

2.02.2015

Go and Do

First, let me take a moment to say GO PATRIOTS!!!!!!! Whew! That was a crazy game. And an awesome game. Just awesome!

Okay, now let's chat about the card I am excited to share with you today! I picked up a simple background inking technique from Day 6 of Clean and Simple 4 over at Online Card Classes that I just loved and wanted to try out right away. Tasnim showcased it using one ink color, but I wanted to use a variety to create a unique background, so I pulled out my Hero Arts Soft Vanilla, Simon Says Stamp Slate, and Simon Says Stamp Audrey Blue and I got started!

Go and Do


I used a strip of post-it tape to mask as I inked and I just love how these colors worked so beautifully together! I then pulled out the Neat & Tangled Oragami Map stamp and the coordinating die for the focal point. I stamped the map on vellum and heat embossed and then die cut the entire thing and adhered it with Kool Tac Clear Foam Tape so the adhesive would raise the map, but not be visible. I seriously love that stuff, you guys. For reals.

Go and Do (detail)


I trimmed a strip of cardstock the length of the card and heat embossed the sentiment on it before adhering it to the card. A few sequins finish it off with just a bit of sparkle.

You guys, I can't even pretend that I don't love this card. Because I do. Lots. For reals, though.

That's all for today! We are getting another foot of snow today, so... yeah. *sigh* HA! BUT, at least the PATRIOTS WON!!!!! YAY!!!!!

Have a Happy!

ShareThis