11.30.2021

Falalalala

 So, this stencil thing is pretty real. And pretty awesome. This entire image was colored using, you guessed it... STENCILS and INK! I know, right? I used the Under the Christmas tree stamps, dies, and stencils from Pinkfresh Studio to create the image and then simply stamped and embossed the sentiment on a strip of cardstock to finish the look.


These layering stencils are seriously just amazing. I had so much fun creating this tree! I used a bit of gold ink to add some shine and sparkle to the decorations, too! 


If you haven't jumped onto the current stencil trend, I highly recommend giving it a shot! It is so easy to do and the results can be absolutely amazing! 

Heads up: The links in this post are affiliate links. It doesn't cost you anything extra, but if you choose to purchase from that link, I do get a share of the sale. 

Thanks for stopping by and have a wonderful day!

11.23.2021

Just a Touch of Sparkle

 I pulled out an older Altenew stamp set for this one. When I saw older....I mean like.... from their first year. LOL! But... you GUYS! It's the Boston skyline and I rarely get that in a stamp or anything else, so this ha always been one of my favorites. I used some color blocking based on a Jennifer McGuire technique video for the design and I really like how it came out.


I stamped an embossed the image in white and then used blending brushes to apply the ink, masking off a strip for the sentiment. I pulled the sentiment from the Concord & 9th Christmas Cottage stamp set, as I have always loved Christmas time in the city and it just suited this card so well. 


And then, what did I pull out? None other than good old fashioned Stickles! I added just a touch of sparkle to the card to finish it off. It sparkles. It makes me happy. The end.

I hope you have a super terrific day!

11.21.2021

Season of Wonder

 So, I made this card and then I was so excited about it I just had to post it before the stack that I have waiting to be posted. It happens, what can I tell ya?

Here's the thing...since I took a super long break from crafting, a few trends have emerged on the technique side and I am trying to learn some new things and do different stuff. Stencils are EVERYWHERE now. Like... they are huge. And hot foiling seems to be pretty big, too. Sooooo...I decided to pull out some of my new Pinkfresh Studio goodies and practice a bit of both of those things! 


I used the absolutely gorgeous Wintry Forest stencil set with some distress inks to create this scene. Now, folks, understand that I often struggle with color choices. I am not super great at brining a bunch of colors together, but I was SO HAPPY with this color combination. Seriously. I love it so much. It makes me happy. For the final stencil, I used VersaMark ink and then heat embossed the snow onto the branches to complete the look. 


The sentiment is hot foiled using the Thrill of Hope hot foil plate set along with the coordinating dies. I cut the sentiment several times and stacked them to give it depth. 

No joke. This is one of those cards that I just kept looking at and thinking... whoa! I made that! LOL! Don't you love it when that happens? Drop a link to a project you are particularly proud of in the comments and I'll come check it out!

Have a great day!

11.16.2021

Black Dogs are the GREATEST!

 Did you know that black dogs end up in shelters longer than any other color dog? For some reason adopters shy away from black pups. Personally, I think that is ridiculous because black dogs (labs, in particular) are WONDERFUL! I have my super great buddy, Wyatt (along with my chocolate lab, Morgan), and he is a great big ball of love. He's also a 100 lb. lap dog, but, alas....

The Newton's Nook and Simon Says Stamp Stamptember collaboration stamp set had this absolutely perfect little Turkey Day pup and I could not resist using him to create a fun Thanksgiving card! I colored him, black of course, with Copic markers and simply stamped and heat embossed the sentiment.


The background is Simon Says Stamp Fractured stamped in grey ink. Nice and simple. While this particular Thanksgiving stamp set is no longer available as it was a limited edition for Stamptember, don't you worry your little puppy loving head... you can check out the Newton's Nook collection at Simon Says Stamp and find ALL KINDS of cute critter stamps that you will just love!

Since this is such a simple card, I only took the one shot. Also... Wyatt was literally hunting me down because I got caught steeling treats for the photo. So... I will share a photo of Mr. Wyatt, since he inspired my card! YAY!


11.15.2021

A Bit of Red, A Bit of Green, and a Bit of Brown

 I mean, when you start working on your holiday cards it's possible that 'Oh! I had better stock up on brown cardstock!' isn't the first thing that comes to mind, but, folks, I'm here to tell you that you just may want to stock up on brown cardstock for your holiday cards! This color combination presented in the Newton's Nook Inky Paws Challenge is really quite gorgeous!


The next thing that may or may not come to mind is to use these colors for... snow. Snowflakes, to be exact. Yup. From the Beautiful Blizzard stamp set. That's what I did. And you know what? I absolutely LOVE it! Turns out snow doesn't have to be blue and silver all the time. 


See what I mean? I used a combination of Hero Arts and Simon Says Stamp inks and I absolutely love how the rich color tones work with those beautiful detailed snowflakes. I stamped and embossed the Pinkfresh Studio sentiment in gold and added a strip of gold glitter paper along the edge for plenty of sparkle and shine!


And... I'm not the only one who loves stamping these pretty snowflakes! Sterling wanted to make a card, too! He is a big fan of pink, so he had to have pink on his and he chose his other colors, too. It doesn't quite fit with the challenge, but that's okay, he's two, he can pick his colors. LOL! He particularly loved the gold ink! This was the first time we've used that one and he thought it was great! We did cheat a little and used the Misti so his snowflakes were a bit easier to stamp and then ended up right where he wanted them. It is so much fun crafting with him!


11.13.2021

More Coffee, please

But seriously, do you have some? I'd love a cup. I have to admit, I am actually a tea drinker, but since my son was born both my husband and I seem to drink a LOT more coffee than we used to. Maybe that's because Bailey's goes better with coffee than it does with tea? HA!

Kidding.

Not really. 

But, alas...I have yet another fun card for the Coffee Lovers Blog hop! I used the Picket Fence Studios Jill Girl stamp and die for this one.


I used the Picket Fence Studio Jill Girl stamp and die. I stamped her on kraft cardstock and colored with Spectrum Noir colored pencils. I just love how she turned out! The background is the Simon Says Stamp Leafy Leaves stamped in Gold Brilliance ink (Tsukineko). I did heat set the ink, since it is a metallic pigment ink, to avoid smearing. The Just Because sentiment die from CZ Designs is die cut three times and layered to give it a bit more depth. I then added just a few metal dots as accents.

This is image has such a cozy feel to it! I just love it! 

Be sure to check out the Coffee Lovers Blog hop to see SO MANY PROJECTS and join us!

And with that, I wish you a wonderful weekend!

11.12.2021

Coffee = Smiles


That's how math works, right? I mean, it must be. Because we all know it's true. Coffee = Smiles. And today is the Coffee Lovers Blog Hop and THAT makes me smile, too! Because basically a whole bunch of talented crafty folks come together and post super fun projects showing off yummy beverages. Coffee, tea, hot cocoa... they all apply. And I am HERE for it, man!

If this is your first visit, WELCOME! I'm Jingle and you can find me on Instagram, too


You guys! I even pulled out my Dunkin Donuts scrunchy for this one. Because of course I have a Dunkin Donuts scrunchy. Do you not? 

I created this card with a wonderful amalgam of products from different places. That wonderful coffee cup is from the one and only Erin Lee Creative. I don't know if her coffee stamp set is available anymore, but her Harry Potter stuff CERTAINLY is, so you should just go buy that now because it's freaking amazing. The little mouse is an undeniably adorable stamp from the Simon Says Stamp and Colorado Craft Company Stamptember exclusive. Ummm.... CUTENESS! You can find all kinds of sets with these cute mice designed by Anita Jeram. They are incredibly adorable. And that sentiment. That wicked cute freaking sentiment? Yeah, that one is a wood block stamp from Simon Says Stamp so not only does it look adorable on a card, but it looks wicked cute on my shelf, too! I die cut the tiny heart from the Simon Says Stamp Mini Hearts die set - this is a super useful set to have around. I highly recommend it.


I colored this one with Copics. Shadows and I aren't actually really good friends because, well, quite frankly, I have very poor spacial orientation and struggle with the entire concept of 'where is my light source', but I think this one turned out pretty cute. All in all, I had a super fun time creating this card! Now, head on over to the Coffe Loving Cardmakers Blog to check out all of the amazing creations out there! 

11.11.2021

Hej Hej!

 Well, that's how it would be spelled if we were in Sweden, anyway. I'm not. I have been. And I freaking LOVE that place, so when I saw this awesome Hey Hey sentiment die from Simon Says Stamp, I knew it was just perfect for me! Plus, I pretty much just greet everyone with Hey instead of Hi most of the time, anyway, so, there's that, too. 


For the background, I stamped the Simon Says Stamp Fractured background using the Rainbow Hyrbrid Ink cubes. I love that these four colors come in a set and work so brilliantly together! I then filled in a few select segments with the Spectrum Noir glitter brush. I've mentioned how much I love that thing. I REALLY love that thing. I wish you could truly see the shimmer that it gives. It is AWESOME. It is also remarkably difficult to photograph, and for that, I apologize.


The sentiment is die cut from the stamped panel and then popped up on a black card base so it stnad out really well. Love that!

This one was a simple one. It came together pretty quickly, but I love how it turned out!

Thanks for stopping by and have a great day!

11.10.2021

We Need a Little Christmas, Right this Very Minute

 We need a little Christmas NOW!

Okay, so I know some of you would prefer to wait a bit, and that's cool, but I had to start on Christmas cards, at least. 

Also, now that song is in your head and that's fun, sooo......


I did lots of things on this card. I don't often do lots of things, but for this one, I did lots of things. I started by stamping and embossing this wicked cool Simon Says Stamp Star to Star background in gold. I kind of love it. I then used the Simon Says Stamp Peace Hope Love Stencil and did some blending with Hero Arts bubblegum ink. That gorgeous medallion is die cut twice, once in black for the 'underneath' part (that's the technical term, naturally), and once from gold cardstock. A bit of foam tape raises the gold over the black.
Finally, the sentiment is an older Simon Says Stamp Joyeux Noel die cut from a nice bright pink cardstock.


I love that this card mixes fun stuff from several collections. I always appreciate when I can use supplies I've had around for awhile along with some of the newer stuff to create new looks.

And thus, we begin with the holiday cards of 2021. Yes, my friends, it has begun. Don't worry too much, though...I will have some others mixed in there, too. I promise.

Have a wonderful day! 

11.08.2021

TOADally Awesome

 So, as it turns out, frogs are cute. Well, some frogs anyway. Particularly the adorable frogs in the Toadally Unfrogettable stamp set from Simon Says Stamp. I mean... JUST LOOK AT HIM!


He is colored with Copics and, well, he's just pretty much the cutest thing EVER! Nice and simple design for this one, but I feel like that image and the fun sentiment did all the work for me, so... simple it is! 


I hope you have a hopping good Monday! Hee-hee.... see what I did there... cuz frogs.... cuz.... 

okay. I'll go now.

Thanks for stopping by!

11.04.2021

Because Beaches Make Me Happy

I am an East Coast girl. We live in a coastal town and let me tell you what the benefit of that is. The benefit of that, my friends, is that a nice walk on the beach or the simple happy making scent of ocean waters is never more than a few minutes away. And that, my dear friends, is what keeps me sane. Happy. Sane. I don't know... maybe both of those things. When I saw this amazing layered stamp set called Sea and Sky from Simon Says Stamp I was pretty sure it was designed for me. Or at the very least for the people like me. You see, my dear friends...it is FREAKING AWESOME!


So, I stamped the sky portion with cloudy sky ink because, well, I mean, it is a cloudy sky, so that just sort of made sense. I like to be practical sometimes. Sometimes. I stamped the water with a nice dark navy and then colored that with Spectrum Noir colored pencils. The sand is stamped with Stampin' Up Sahara Sand ink. Because it is sand. Again, with the practical. Who knows...maybe it will become a habit.


Finally, I added a whole bunch of sparkle with a Spectrum Noir clear glitter brush. You GUYS! If you don't have these get some. They add a TON of sparkle and shimmer. It's not subtle. I like my sparkle to...well, you know....SPARKLE!

I finished this card with a simply cut CZ Designs Wish I Could Hug You die cut sentiment because it was basically the perfect fit. I mean... the beach is like a hug. It makes you feel calm and cozy and happy. YAY beach! 

I hope you have a delightful day. Maybe with just a hint of salt water in the air.


11.03.2021

Two Cards for the Price of One!

 Well, 'price' probably isn't the right word, but basically, I started out creating one card and ended up with two very different designs from the work I put into it. I kind of love them and how very different they turned out even though they use the very same basic supplies all around.

Here are the supplies I used:

Simon Says Stamp Leafy Leaves Background Stamp

CZ Designs Chunky Thankful Die

Prima Watercolors, Decadent Pies

And a Neat and Tangled Maple Leaf stamp that is no longer available, but you can find a similar one in this Simon Says Stamp set

Oh... and some cardstock, bristol, and May Arts twine


Fir this one, I stamped the background on bristol and watercolored it to create a nice fall background look. I then die cut the sentiment, saving the middle pieces, adhered the painted panel to a card base and then adhered the sentiment pieces back into the 'Thankful' to make a cool outline look. This let the background be the star of the show for this card.  A simple wrap and bow with twine finished it off nicely.


Now, as you know, I don't normally just jump into a supply list. BUT... for this one, I had to because... CHECK IT OUT! After making this card, I realized I had the perfect makings for a beautiful clean and simple design with the leftovers!


There is a slight chance I like this one even better. Even though the painting took a bit of time and effort and you can't really tell that as much here, BUT, alas...I still LOVE the way that die cut sentiment looks cut from the stamped and watercolored background. It's like.... perfect. So, I used the outline that was left over on a simple white panel and then just stamped a few maple leaves to finish it off in a nice deep red tone. 


Two cards from one set of work! LOVE IT! And I hope you do, too. Never forget to check out what your 'scraps' are giving you! You may just find some treasures in there!


10.27.2021

A Little Halloween with a Little Potter Mixed In


Is that okay? Can I squeeze in one more Halloween card for this year? I had fun with this one, taking some fun Halloween stamps and giving them a bit of a Harry Potter twist. Because who doesn't love a sorting hat and a Nimbus 2000? Right? Right. Good. Glad we had this chat.


So, not gonna lie. This one sat on my desk for several days while I decided if I was brave enough to share it. Now that I'm looking at it fresh again, I think I actually really do like it. It's fun! I stamped the hat and the broom from the Simon Says Stamp Toil and Trouble stamps and dies set onto kraft paper and then colored with Spectrum Noir colored pencils. I went for the weathered Sorting hat look on the hat and um..... I REALLY REALLY LIKE IT. K? K. Thanks. I die cut both pieces, along with the tree from the Ghouls and Tree die set from Simon. 


I finished the card by adding just a touch of Reverse Confetti patterned paper and then stamped, embossed, and die cut the sentiment and frame together. 

And, my friends, there you have it. A bit of Halloween and a bit of Harry Potter all rolled into one fun card. Now... where did I leave my robes, I gotta fly......

10.25.2021

Because RAINBOWS!

Yup. I yelled rainbows. I'm gonna do it again. RAINBOWS!!! You guys, for reals, though. This awesome Build a Rainbow stencil and the accompanying die from Simon Says Stamp is freaking awesome. 


I used the SSS Rainbow Ink Cubes and blending brushes along with the stencil to create the rainbow itself. Then I die cut the bottom panel and inked the cloud edge to create the cloud look. LOVE IT. The sentiment is the You Are Enough die from Simon, too. Finally, I went a little old school and pulled out an old wood starburst embellishment, used a paint pen to make it white and then covered it with... you guessed it... STICKLES! I think Sterling (my toddler) is bringing back my love of glitter glue. Mostly because he puts it on everything he possibly can. 


Stenciling is super popular right now and it has never been a big thing for me, so I am trying to give it a shot here and there. I think I may end up loving it. This was certainly a TON of fun to create and not a SINGLE stamp was used to create it. WHAT?! That's craziness. Absolute craziness. I do adore how vibrant the colors are, though! That's pretty awesome! And the cool variation you get from using the blending brushes with ink... yeah, I'm liking that, too.

What technique have you been trying out recently? I'd love hear about it! 


10.22.2021

Cute Spooks

 So, seriously. When you give me absolutely adorable Halloween supplies I just cannot help myself! I am loving creating these cards! 


For this one, I started by die cutting the  Simon Says Stamp Window Webs from a white panel. I just knew I had to create a super cool background to put behind it, so I decided to ink up another cardstock panel to create a night sky using distress inks. I then put a little white ink from a bottle of reinker on a paint brush and splattered it to create the stars in the sky.

You guys! This was a lot for me. LOL! I don't do a ton of messy things anymore, but I absolutely LOVE how this turned out and I super love that it uses those techniques and still results in a clean and simple card.

I stamped the absolutely adorable ghost witch stamp and the spider from the Too Cute To Spook stamp set from Simon Says Stamp and colored them with Spectrum Noir colored pencils. I cut the ghost out, but you can purchase dies with the stamps if you prefer to go that route. Either way... this stamp set is THE CUTEST!

The sentiment is stamped and embossed on a strip of black cardstock to finish off the card. I am linking this little guy up to the Simon Says Stamp Wednesday challenge.

I hope you have enjoyed my Halloween fun this week! I may do more, I may do some other stuff... we shall see. Thanks for stopping by! Feel free to leave a comment to let me know you are here! 

10.21.2021

Friendly Little Bats

 I mentioned that I really like bats, right? When I saw the Reverse Confetti challenge to create a card with a Thanksgiving or Friendship theme, I figured it was a perfect time to combine my love of Halloween and bats with a friendship sentiment for a cute little card.


I stamped the three little bats from the Reverse Confetti Best Witches stamp set and colored them with Spectrum Noir colored pencils. I am discovering that I REALLY love coloring with colored pencils. I honestly feel like I work better with them than I do with my markers a lot of the time. I am loving it. It is also wicked relaxing to feel the smooth pencil over the paper. I don't know...I just really enjoy it.

After stamping and coloring the bats I added a quick stamped star and then finished it off with a great Lawn Fawn Hello die. The friend is actually hand written with a Copic pen to get the look I was going for.  

This card was one of those ones that I just really enjoyed creating. It makes me smile.

What are the kinds of things that just make you happy when you create? Is it coloring? The actual stamping? Putting together various design elements? I'd love hear about it in the comments!

10.20.2021

Spooks and Spiders

 I love Halloween! I truly do. It is just so super fun and, well, candy. There is sooooo much candy. What could possibly be bad about all that CANDY?! This week, I have a couple of Halloween cards I'd like to share with you to get you ready for the fun!

As it turns out, Simon Says Stamp has a BUNCH of super cute Halloween stuff! I love these because I can use them both for cards and for scrapbook pages! WHAT?! Yeah. Love it. 


Let's talk about the goodies I used fort his one. I started with this SUPER cute Creepy Crawlers Cling Background by CZ Designs. Can I tell you how much I love Cathy's stuff?  A lot. I love it... a lot. I stamped and embossed it with white embossing powder on a black panel for a nice pop!

I die cut the sentiment 'window' from that panel and then cut the sentiment itself in both black and gold. This is all done with the adorable Here for the Boos die from Simon Says Stamp. I layered the two sentiments just slightly offset for a shadow look. 

Finally, I stamped and colored the wicked cute little ghost from the Simon Says Stamp Boo Day stamp set. You can get this set with or without dies, but MAN is it an awesome set! So many cute images AND there are great pieces in this one you can use all year long. I lover versatile stamps! I colored him with some Copics and popped him up for just a bit of dimension. SO FUN!


I am linking this one up to the Simon Says Stamp Wednesday Challenge for the Spooky Halloween Challenge! 

I had a BLAST creating this card. I love how the elements all came together so well. What do you like to create for Halloween? Even better - do you have any fun traditions to share?


10.12.2021

I Can Do Hard Things!

 That is what I learned while trying my best to participate in the Simon Says Stamp Wednesday challenge this week. You see, the challenge was to create an interactive card. 

Cool.

Not my thing. 

I mean...I think they are awesome and all, but I have the patience of ... well, let's just say I've seen my toddler stick focus on a project for longer than I generally do.

So, yeah... interactive cards are tricky! 

I had this cool Waffle Flower Pull-tab Tree die in my stash and I hadn't used it yet, so this was the perfect chance to give it a shot!


I stamped this wicked fun cat tree stamp from Mama Elephant and colored it with colored pencils before die cutting the tree. This stamp is a perfect fit for this die! I love it when that happens! The cats were super fun to color, too. And that's coming from a dog person!


A simple punny sentiment on the bottom over the Simon Says Stamp tiny star stenciled background finishes off this super fun holiday card. 


It was hard. But it was fun. And it's interactive! YAY!


Have a great day!

10.11.2021

Well, Bats!

 I love bats. I really do. They are just so great!

I have this wicked old Tim Holtz bat stamp in my stash and I just can't help but to pull it out around this time of year. It's just too good.


I combined it with this Hello die from Simon Says Stamp. You, guys! This die is one of my all time favourites! Seriously. It is THE BEST. I love how huge it is. It makes me happy.

I stamped the bat on the card and then again on another bit of cardstock, cut out the second image and popped it up for a bit of dimension. I did a bit of snipping off the sentiment to make it fit comfortably under the popped up bat, keeping the design all cohesive. 


I had a lot of fun with this one. I think we tend to shy away from using older supplies sometimes, but you know what... if you love it, USE IT! Go batty! 

Have a great day!

10.07.2021

A Little Bit of Sparkle

 Hello! Thanks for coming back! I am so happy to see you here.

Okay, you are right, I can't really SEE you, but I can tell you are here and that makes me happy. 

So, the other day, a crafty friend posted a 'feature company' in one of the Facebook Groups I am in (Share Handmade Kindess), featuring Picket Fence Studio. As it happens, I am a fan of Picket Fence! As a matter of fact I find Nicole's designs to be wonderfully unique in the industry and I really enjoy working with them. I posted that super fun fox card the other day using Picket Fence stamps and I have another card featuring a gorgeous floral image today. 

What I really love is that these two cards feature the same company and they are SO different. One is cute and playful and the other is 'pretty' and floral ... and sparkly. Because, well, I happen to really love sparkly. 


I stamped this gorgeous floral image with Gina K Amalgum ink, allowing me the flexibility to use any kind of coloring medium on it, really. I had a couple of ideas when I was stamping it, so I wanted to leave my options open. 

I then stamped the strong thank you sentiment using VersaFine black ink to be sure to get a good, solid image. 


Finally, I used a Spectrum Noir glitter brush to add some sparkle to the image and a few sequins for just a TEENSY bit of color. 

You can find this gorgeous Wild Rose Bouquet stamp set at Butterfly Reflections Ink and the thank you sentiment is available at Simon Says Stamp.


As for fun things around here, last. night we carved a pumpkin with The Little. He has dubbed it his 'Wampire Pumpquin' and said that he loves his Wampire Pumpquin very much. That video may end up landing on my Instagram. LOL! We'll see. 


Have a super fantastic day!


10.05.2021

For Fox Sake

 I mean, it's only been five years. That's not all that long in the grand scheme of things, now is it?

It is?

Okay. Fine. It is.

But, here's the deal...I've done a lot in those five years. I was working at Spotify and that kept me pretty busy and doing a bit of traveling, and then I left Spotify and went to work at DraftKings, where I work now and love super lots. We had a kid, so, that's pretty huge. He's coming up on 2 1/2 now and keeps us VERY busy. And there was the whole Covid thing.... Oh... and come to think of it we bought a house in there somewhere, too. A house that needs constant work that we are constantly working on. So, yeah..... lots of stuff happened in those five years.

On the crafting front, well, I haven't been designing for companies and I haven't been playing the publication game for a few years now. I miss it a little. I have done some crafting when I have time here and there, but lately, I have really been trying to jump back in and I am LOVING it! So, here we are. Dusting off this old blog. Because I like making things and I like sharing those things with others. YAY!


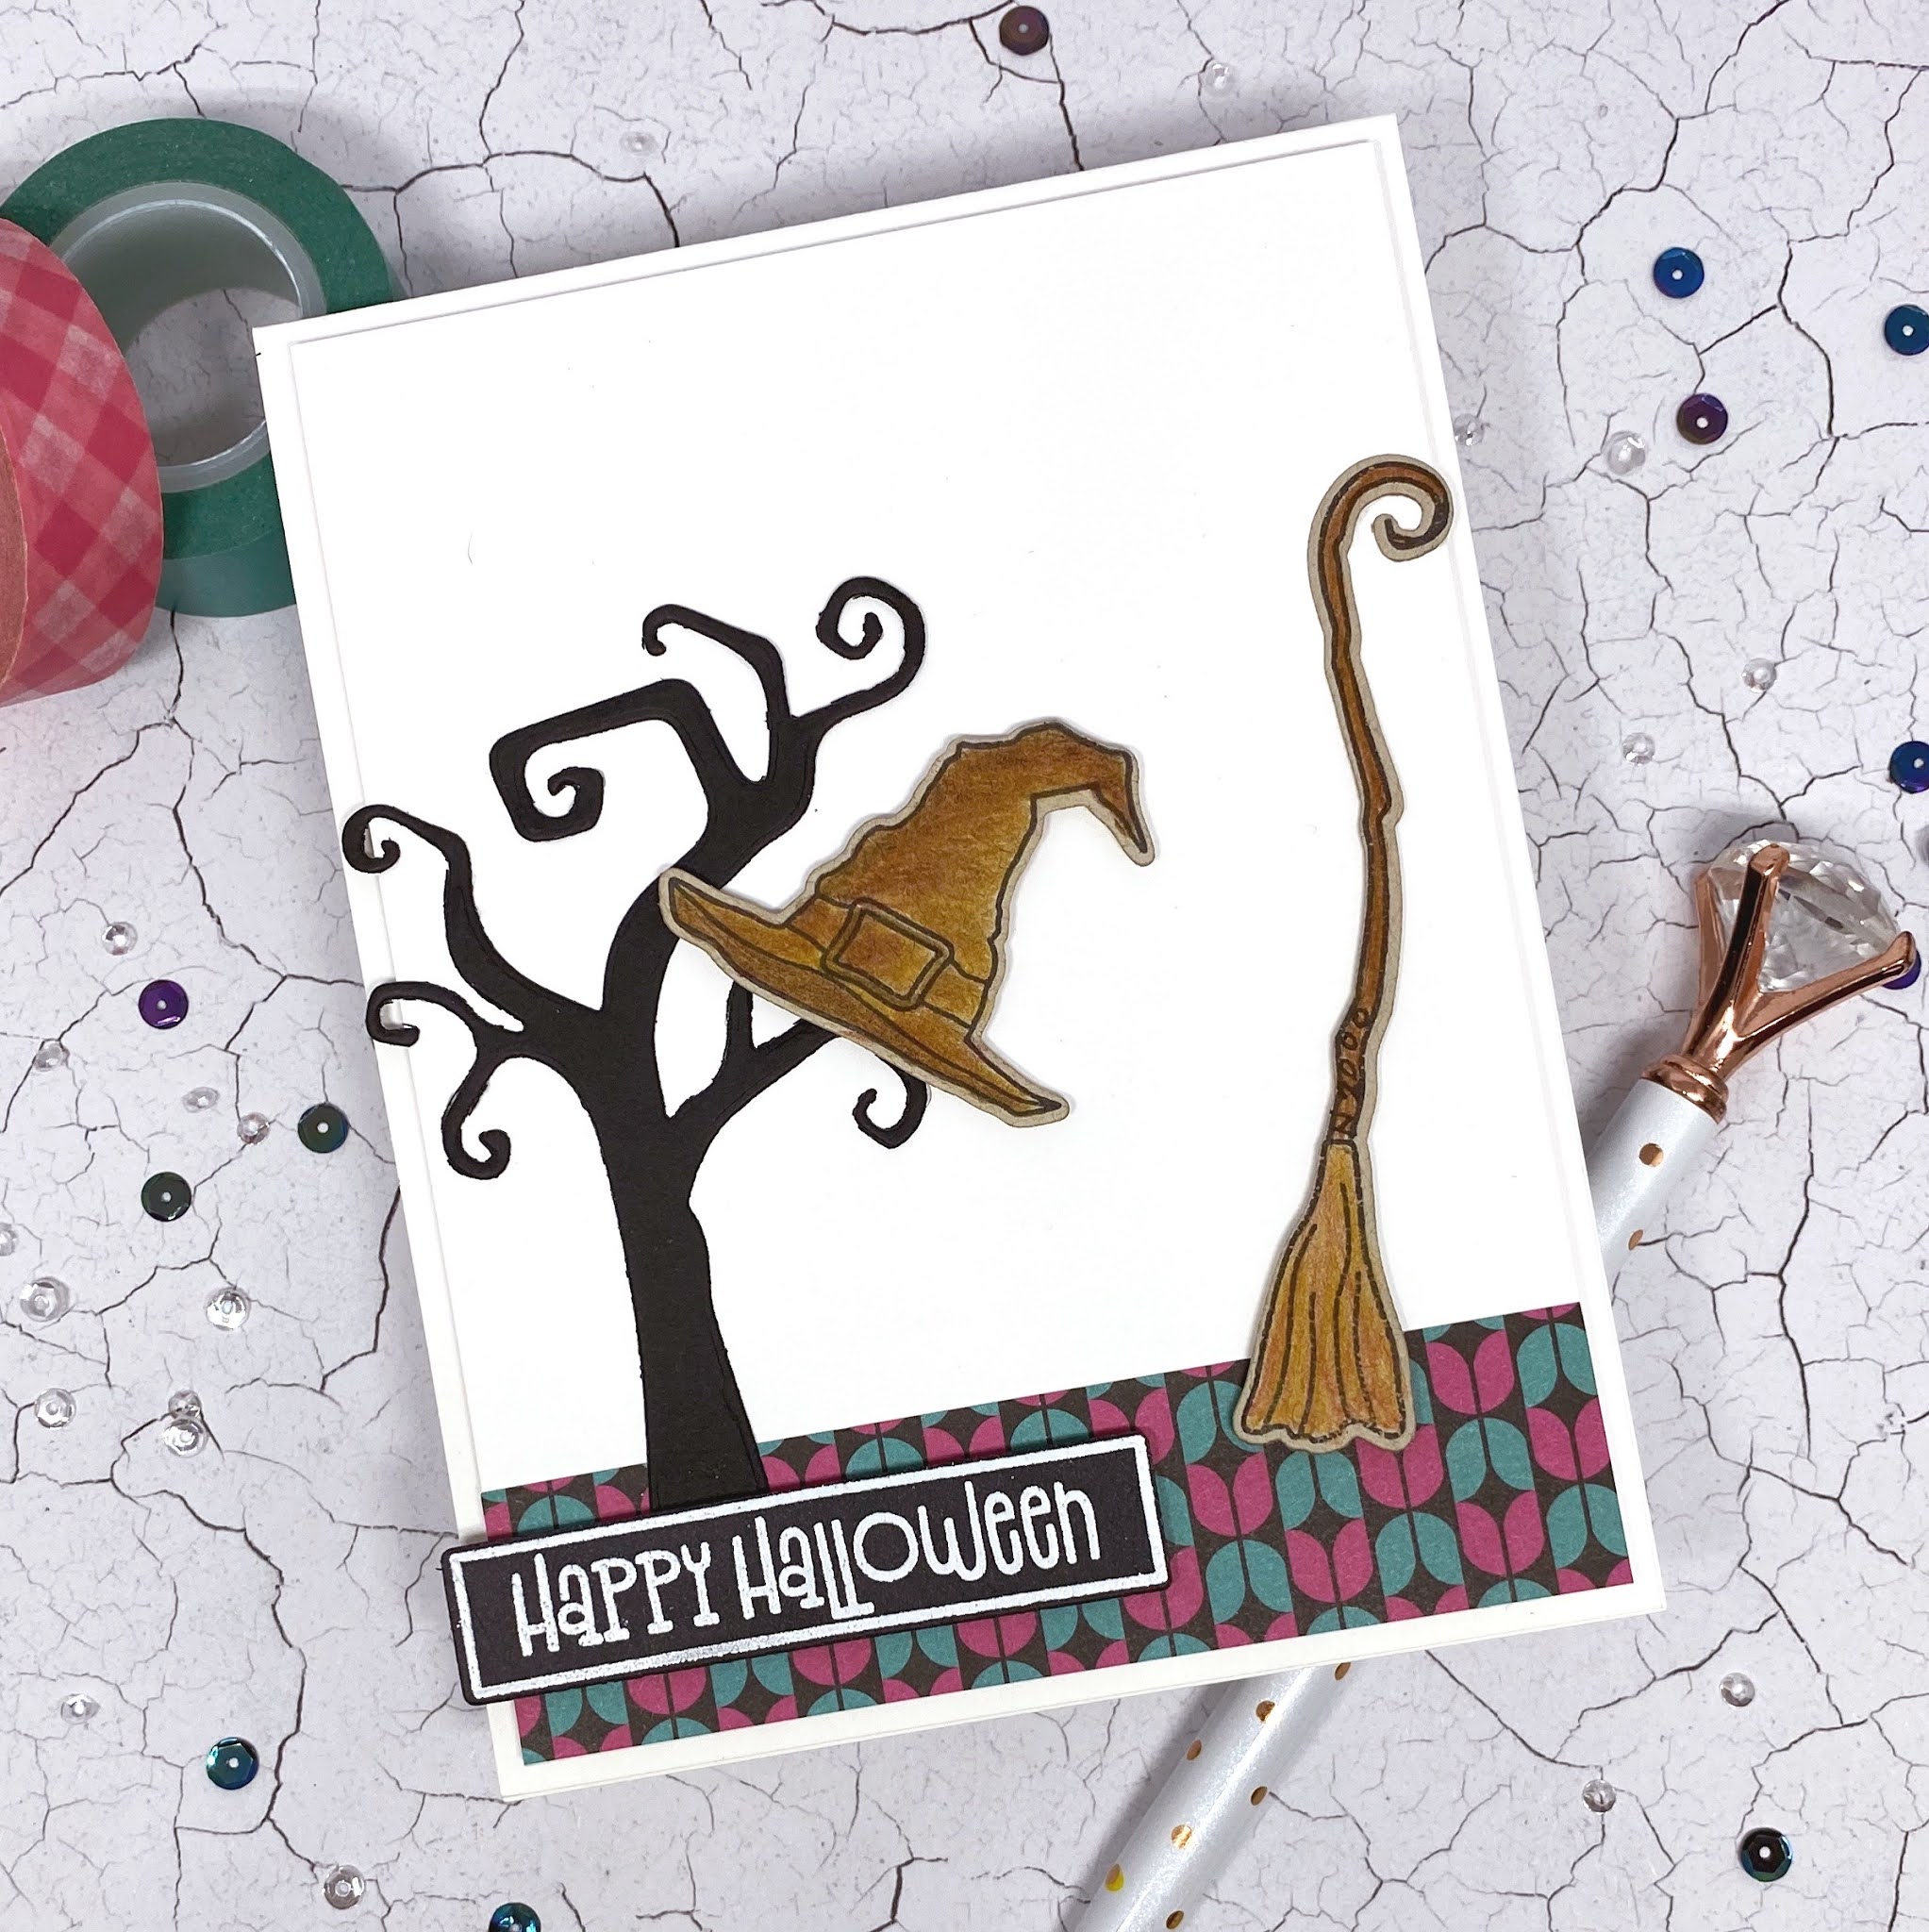
This seems an appropriate card after a five year 'break'. HA! 

I love this super fun stamp and die set from Picket Fence Studio! It isn't brand new, but you can still find it here. And there are SO MANY adorable images in this set!!!! I love it. I do apologize that my stash is not all filled with the latest and greatest anymore. I will have some newer stuff sometimes and I will also be using my old faves that I've had around or things I pick up just because I love them.

I colored him with Copics after stamping with Gina K. Amalgam black ink. I die cut him and popped him for that fun 'in motion' look. the partial circles are just some washi tape stuck onto cardstock and then punched with a good ol' Martha Stewart circle punch. 


And, that my friends, is what I have for you today! Thanks for stopping by! I missed you!

ShareThis