Showing posts with label altered art. Show all posts

2.08.2015

Dressing Up Notebooks with Spellbinders

I love Moleskines. It's sort of an obsession, actually. They are just wonderful little notebooks that are incredibly useful and come in all kinds of sizes and paper types and they just make me happy. That being said...I may have a few more around than one might actually 'need', so to speak. Not that that ever happens. HA! Well, today I have a super fun post over on the Spellbinders blog showing you how to add some pizzaz to your little notebooks making them even prettier AND even better gifts. Be warned, however, when you finish one to give as a gift you will want to keep it, so just go ahead and make two. K? K. Glad we had this talk.

The Best is Yet to Come


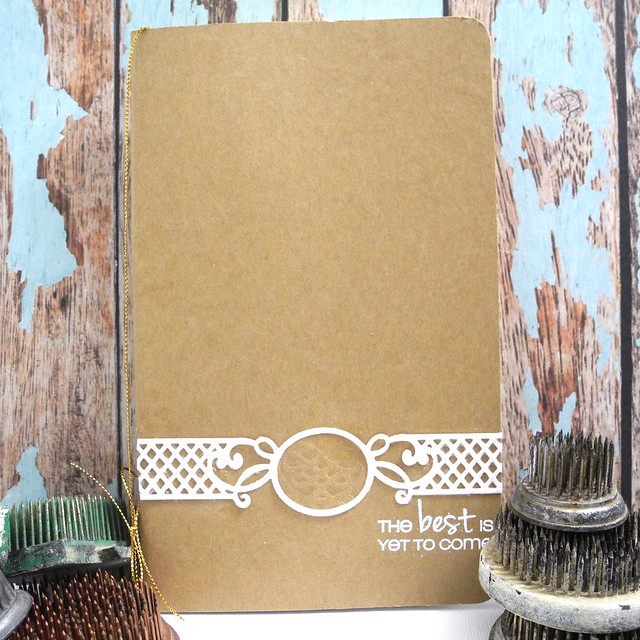
I created this one after creating the one over on the Spellbinders blog. This is a much more simplistic version and I think I may like the other better, but, the simple truth is... I love them both. For reals. SO...that means you need to head on over to the Spellbinders blog to check out the one I made there along with the FULL tutorial on how to create a similar look! I think you will like this one! For reals, though!

Notebook Step 2


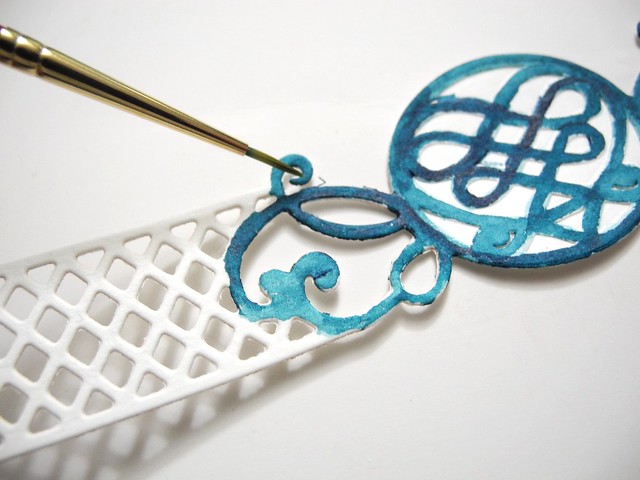
Here is a little sneak at the work that goes into the one you will see over there. Be sure to check it out and leave some love over on the Spellbinders blog!

Have a Happy!

2.05.2013

Getting Around

It's a busy week out there in blogland!  I have a couple of exciting things I don't want you to miss!  First of all, it's time for the Fresh Squeezed Stamps February release!  YAY!  Seriously, you guys... this might be the best one yet!  I am so loving the stamps!  There is a sneak up over on the Fresh Squeezed blog today and tomorrow we will start showing off our cards along with the full sets! YAYNESS!

Step 3

Also... I have a tutorial for this yumminess, along with a matching card for Valentine's Day over on the May Arts blog today! AND...while you are there... it's the Ribbonista Blog Hop week, and that means lots of inspiration and lots of prizes, too! Be sure to check out the blog hop! My post will go up on Friday, but you won't want to miss the others all week long!

And finally, just in case you ever need a reminder... a simple sentiment with a lot to say...

Yellow You're Very Special

This one was created entirely from the Simon Says Stamp January Card kit. You can buy the stamps separately, too, if you like them! I love that sentiment! It's a happy!

And with that, I wish you a delightful day!

Have a Happy, folks!

Jingle Out!

12.27.2012

Simon Says Stamp Challenge - We are GIFTED!


It's an Anything Goes week over at the Simon Says Stamp Challenge Blog this week! The design team has had a lot of fun creating gifts for EACH OTHER! That's right! We created fun gifts for one another and sent them on their merry way! Here is the bracelet I created for Miss Dawny!


I used some fabulous Aged Rose ebmossing enamel from Stampendous! to cover my bracelet and then added a bit of stamped tissue to the flat surfaces to add the images.


Come play along with us this week (Anything Goes!) for your chance to win a $50 Gift Voucher from Simon Says Stamp!


12.21.2012

Christmas and Candy! They go together like...

...well, like Christmas and candy, dude. For reals. Similes aren't really needed for this one. Just sayin'.

So...because they go together so well, it seemed the perfect office co-worker gift for Christmas! I was EXTRA nice and pulled out my Echo Park Winter Wishes paper pack. (That's good stuff, folks...for people who won't even know. *sigh* LOL!) I combined that with some fun washi tapes and great stamps from Unity!

Wrapped Candy Bars

I also made some cards for folks at work, but I did these for my department. Pretty fun stuff! I love Christmas and I love giving people little pieces of happy! YAY!

Wrapped Candy Bars

Wrapped Candy Bars

These were super fun to create! They would be great for stocking stuffers or other fun little treats, too!

MERRY CHRISTMAS!!!

12.18.2012

Ornaments Make GREAT Gift Toppers! {May Arts Ribbonista Blog Hop}

Welcome to Just Jingle!  If you are visiting from the May Arts Ribbonista Blog hop, I am so glad you are here!  If you are a regular..I'm SUPER so glad you are here!  :)  Love you guys!!!  Today I have a fun ornament tutorial for you using some fabulous ribbons!

Ribbon Ornaments


Aren't they fun!  And they aren't too tricky, either.  I love these because they make GREAT gift toppers along with a pretty ribbon or twine bow!  I began with some Layered Chipboard Ornaments from Coffee Break Designs.  I also used several of my favorite May Arts ribbons including the 1/8" Velvet in teal, yellow, and purple, the blue stripe twill, pink diagonal stripe, red metallic velvet, and silver metallic string.  I also used Lawn Fawn's Let it Snow set and Fa-La-La 6x6 paper pack.

DSCN9923


Begin by adhering the ribbon to the ornament base with Scor-Tape sheets.

DSCN9924

DSCN9925

Cover the front portion of the ornament with patterned paper and adhere over the ribbon covered background. Trim the ribbon after adhering the top.

DSCN9926

Stamp and emboss one tree per ornament. Cut out the trees and adhere to the front of the ornaments.

DSCN9927

Finish off your ornaments with a bit of the silver string and attach to gifts or hang from your own tree!

The hop lasts all week! To see the others posting today, check them out below! Don't forget to check out the May Arts blog each day this week for more inspiration and prizes, too! (The Ribbon Lady is ALL about prizes! ;))

Jingle
Karen
Kendra
Vera
Ashley

12.17.2012

Glitter. I like it. Just sayin'.

Yes. I'm one of those people who actually LOVES glitter! Even the kind that isn't already encased in glue! HA! When this fabulous Pine Lake StandUp Village came from Retro Cafe Art Gallery ALL I could see was glorious houses covered in GLITTER!!!! YAY!!!!! So...that's what I did. Just sayin'.

Glitter Houses

I chose three of my favorite Martha Stewart glitters and covered the houses entirely in it! LOVE!!! I used Liquid Pearls to accent the windows and doors.

Glitter Houses (detail)

I added a few drops of liquid pearls to the little bottle brush trees to give them a pretty holiday feel and glued them directly to the base in front of each home. I just love how cheerful and fun this one is!!


So...a bit of holiday decor to make everyone smile! I kinda love it. I hope you are all well! Have a Jingle-tastic day!

Jingle Out.

12.01.2012

Stampendous! and DIY Bangles Blog Hop!

It's time for the Stampendous! and DIY Bangles Blog Hop!!! I have created a fun Santa pendant to share with you today using one of the simple tube beads from DIY Bangles. I used several layers of Snow and Ruby embossing powder on the bead, overheating just a bit to achieve a vintage look. I then used Scor-Tape to adhere flock and glitter to create a Santa look on my bead! A bit of May Arts twine finishes off the pendant, making it a fun holiday necklace!

Santa Bead Pendant

At each blog (or just the ones you want) leave an insightful comment that lets us know you actually looked at the project and we'll enter you once for each comment in a chance to win some DIY Bangles, beads, or circles plus some Stampendous goodies with which to embellish them.
We sure hope you've had some serious fun with our collaboration this week! Thanks for joining us.  Would you mind sharing our hop on your Facebook page? We love being able to offer these great prizes and the more we have the more we can offer!  Join us, as well for our new December Challenge - CAS (Clean and Simple) Christmas Cards. We'll be doing our best to give you last minute card ideas you can complete quickly to fill out your card sending list. We'll be providing simple Christmas card inspiration all the way up until Christmas day, so stick with us. This will be our last challenge of the year and we're mulling over what to do next year, so stay tuned for that as well!

Thanks for stopping by and don't forget to check out Kristine's blog next!

Jingle Out!

11.26.2012

A Pretty Bracelet, handmade? Sure! I can do that!

This week Stampendous! is teaming up with DIY Bangles to show off some totally awesome projects! These are PERFECT if you like to make handmade gifts for your loved ones!

I got to play with the large Pentagon bangle for this one. It began as simply a plain, wood bracelet, but with a bit of Stampendous! magic... well....

Butterfly Bangle

I began by covering the entire thing with Aged Rose Embossing Enamel. I covered both the outside and the inside of the bangle. To do this, apply VersaMark in sections, sprinkle on the enamel, heat, and repeat until you have gone all the way around the outside. After completing the outside, do the same on the inside - you will need a VersaMarker or a small VersaMark ink pad to easily ink the inside of the bracelet.

Butterfly Bracelet

The next step for this piece was to stamp the butterflies and flourish from the Charm Collection Perfectly Clear Stamp Set on white tissue with StazOn ink. I carefully trimmed these pieces and then affixed them to the bangle using Beacon Fast Finish.

Butterfly Bracelet

Finally, I glued gems around the bracelet using Beacon Fabritac. (This stuff is pretty strong, so it was a good choice for this project.) I love how it turned out! AND...I know exactly to whom I'm giving this fun bracelet!

Head on over to the Stampendous! Blog to check out the rest of the great projects made today!!! And be sure to check in throughout the week for LOTS of inspiration!!!

11.19.2012

Cookie Cutter Christmas {May Arts & Helmar Blog Hop}

Hello, friends! I hope you had a super fabulous weekend! I have a super fun project to share with you for the May Arts & Helmar Blog Hop today! If you have come from Jen Shears blog, you are on the right track! If not, hop on back to the May Arts blog for the complete hop list!


Today I'm showing you how to create these super fun Cookie Cutter Christmas Ornaments!

Cookie Cutter Christmas Ornaments

These make fabulous ornaments on the tree and they are wonderful accents on top of beautifully wrapped gifts, as well!

To begin, choose the papers you would like to line your cutters with. I used Little Yellow Bicycle's Once Upon A Christmas line for mine! Cut pieces large enough to fit under the cutters and match the papers to the cutter you wish to pair them with.

Step 1

Before adhering to the paper use a Crop-a-dile to punch holes in the top of each cookie cutter.

DSCN9608

Next, use Helmar's Gemstone Glue to carefully line the sharp edge of the cookie cutter and adhere it to the paper (adhere to the side you want to show). Allow to dry.

DSCN9607
DSCN9609

While they are drying, carefully apply glitter glue to the top side of the cookie cutters. Allow to dry thoroughly before moving to next step.

DSCN9610

Cut out each cookie cutter from the paper. The gemstone glue is nice and strong and will hold the backing onto the cutter nicely! Apply adhesive all the way around the outer edge of the cutter and adhere ribbon around the edge. I used May Arts Woven Burlap and Grosgrain ribbons for this.

Cookie Cutter Ornament

Pull several strands of May Arts burlap string, tied in a loop, through the hole to create the hanger for the ornament.

Moose Ornament

And that's it! These aren't too hard to create at all and they are way super fun! I hope you enjoy making some for your very own Cookie Cutter Christmas! You have reached the end of today's hop! Be sure to check back on the May Arts blog tomorrow for another list of inspiring blogs!

DSCN9614

Jingle Out!


11.16.2012

Steampunk Circus and Retro Cafe Art Gallery GIVEAWAY!

It's FRIDAY, folks!  And...for most of us, next week is a super short week, so that makes it an even BETTER Friday!  YAY!  I say it's time to celebrate with a fun giveaway, what do you think?  Today, the fabulous Kristin is offering Just Jingle readers a chance to win a $25 Gift Certificate to the Retro Cafe Art Gallery store!  You already know I love RCA, but if you haven't checked it out you are MISSING out! SEE THE BOTTOM OF THIS POST FOR HOW TO ENTER TO WIN!

P.S. Retro Cafe Art Gallery has an AWESOME supply of Washi Tape, Baker's Twine, AND Tim Holtz goodies, too!


I want to share the Steampunk Circus shrine I created recently using some fabulous goodies from Retro Cafe Art Gallery!

Steampunk Circus Shrine - Soft Focus


I began with the awesome Steampunk Shrine Kit and covered it entirely with Graphic 45 papers.  You can also buy premade curtain cutout sheets to go with the shrine kits if you prefer.

Steampunk Shrine Gear Detail


The gears come with the shrine, and I used a gold leafing pen to make them a pretty metallic gold color.  You can also get the gears separately in a variety of forms!

Steampunk Circus Shrine detail


I used the Circus Paper Cutouts tucked into the fabulous little Theatre Character Stands painted with a silver leafing pen.

So...how do you win the $25 Gift Certificate to Retro Cafe Art Gallery?  Well, it's easy!

Head on over to the Retro Cafe Art Gallery Facebook page, like it, and let her know Jingle sent you!  Then just leave a comment here on my blog telling me that you did that and what your favorite thing from the Retro Cafe Art Gallery store is!

The giveaway will remain open through Friday, 23 November.  The winner will be announced on my blog and will have 48 hours to claim the prize.  After 48 hours, a new winner will be drawn.  This giveaway is open worldwide, as it is a gift certificate with a set amount.  I receive free product from Retro Cafe Art Gallery, as I design for the store, however, I was not given any financial compensation for this post and all opinions are my own.


10.27.2012

Stampendous! New Release Blog Hop!!! {Giveaway}

Hello, friends! I hope you have been enjoying all of the awesome posts throughout the week for the Stampendous! New Release week! We all have one more project to share with you today for our blog hop! You will NOT want to miss out on this! TONS of inspiration!!!

Be sure to visit all of the blogs along the way THREE people will WIN Stampendous! PRIZES!!!!

I created a frame using the beautiful new Spring Bouquet Jumbo stamp set from Stampendous!

All of the Flowers

I covered the $1 frame from Micheal's entirely with Vintage Lilac embossing powder. I love how it has glitter in it and makes the frame sparkle! I colored the bouquet and the butterfly, cut them out, and mounted them on the frame. It is surrounded by pearls from Eyelet Outlet.

All of the Flowers Frame 2

Now you will want to check out what the rest of the team has created! You are in for a real treat today!


 Annette Witherspoon 
Asia King 
Barb Turpin 
Cyndi Bundy
Janelle Stollfus  
Jennifer Ingle 
Jennifer Dove 
Kristine Reynolds
Lea Kimmel 
Mary Dawn Quirindongo 
Melinda Gleissner  
Pam Hornschu 
Rhea Weigard
Suzanne Czosek
Taylor Usry
Tenia Nelson
Tobi Crawford
Wenday Jordan
Wendy Price 
Yana Smakula 

ShareThis