Showing posts with label gifts. Show all posts

3.17.2015

Make it 3D with Bazzill Basics

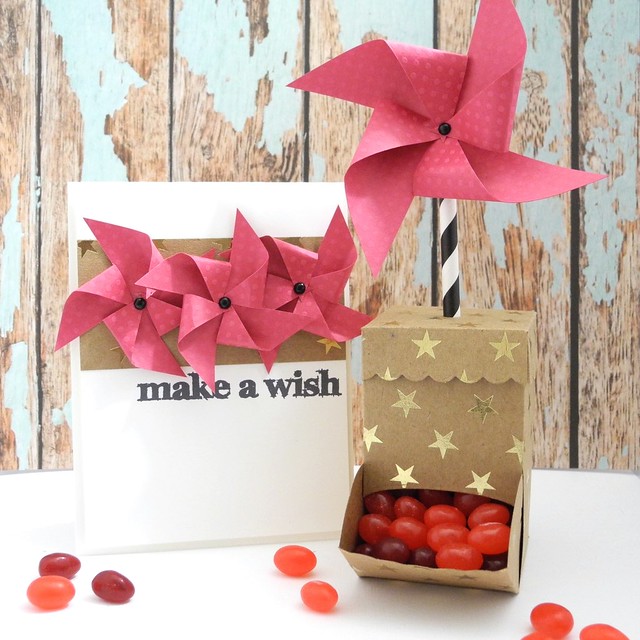
I have some VERY exciting news to share with you today! I am now a member of the Bazzill Basics Design Team! I am beyond thrilled to be joining this awesome team of amazingly talented designers! My very first post is up over on the Bazzill Basics blog today and I would love for you to stop by to check it out!

DSCN7420


I created this super fun candy box and coordinating card. You can find more information about this project, along with a ton of inspiration on the Bazzill Basics blog.

Have a Happy!

12.11.2014

Because LISTS!

Lists. I love 'em. Really, I truly do. They make things so much easier. And the pure JOY one gets from checking items off a long to-do list is just FABULOUS! Fabulous, I tell you. For reals, though. Sooo...when Joscie came up with the idea for these AMAZEBALLS stamps, I was one hundred percent on board.


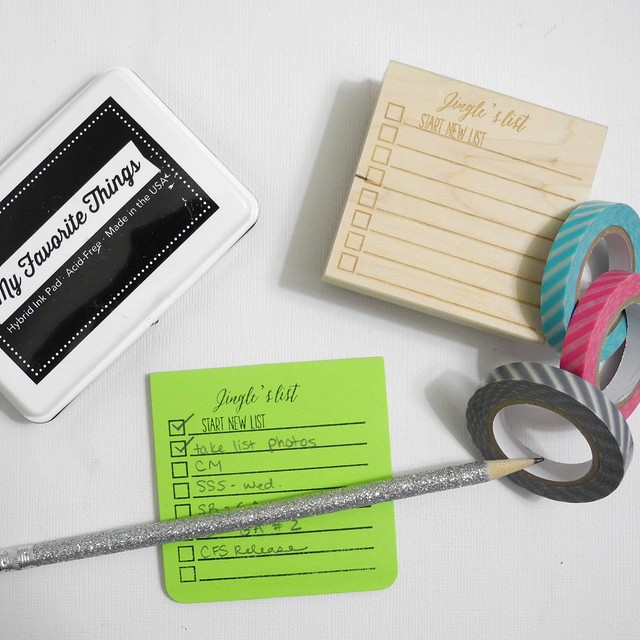
Umm... yeah. So, here's the deal. There are two versions of this amazing stamp available at Bossy Joscie. The one shown above, where you can add any name or description you like in the box... like say.... Santa's nice list, My to-do list, Honey-do list, etc.... OR, she has a personalized one available that I needed. NEEDED, I  tell you!

Jingle's List


Are you seeing that? Do you SEE how perfectly that fits on a sticky note? Yup. That was on purpose. You can stamp this fabulous list onto a sticky note AND, not only do you have a super cute, ready to go list, BUT WAIT! THERE'S MORE! Yes, my friends, you also get to check off the first item on your list right away because... you did it! You started a new list! Congratulations! I am telling you, folks, this was some pretty genius design work on this one. For reals.

Also, if you haven't checked out Bossy Joscie, you simply must. MUST, I tell you! There you will find a wide selection of gorgeous custom stamp options and flair, both custom and ready to ship!


Wanting to buy an awesome list stamp for Christmas? There are a few of the non-personalized ones in stock and ready to ship. If you would like a personalized one, Joscie will happily print out a card showing the awesome stamp that is in progress so you can stuff that stocking with a fun surprise! Head on over to check it out. Seriously, though. You know you want to.

Have a Happy!


12.16.2013

A Simple Holiday Gift

Are you still looking for some great last minute stocking stuffer ideas?  Today I have a cute little project that is not only easy and quick to create, but makes a wonderful gift that you can personalize for anyone!

Monogram Paper Weight


Last time I went to the CK Convention I picked up a few of these clear glass paper weights.  To create this fun one, I simply used Glossy Accents to evenly coat the bottom of the weight and then added my paper design.  To the paper, I adhered cork to make it safe for all surfaces and to protect the paper, as well.  The monogram is added to the top of the paper weight to personalize it!

Monogram Set


For this one, I happened to make a coordinating card, as well.  You could easily change up the design to make it a Christmas card that coordinates with your weight, as well!  :)

So, there you have it!  A fun little handmade gift idea that is super cute and totally simple!

Have a Happy!

2.08.2013

May Arts Ribbonista Valentine's Blog Hop

Hello, friends! It is the beginning of what looks like it is going to be QUITE a snowy day here in Massachusetts...I'm actually curious to see just how much snow this one brings... they were saying 2 1/2 feet in our area...I'm thinking it may be hard to find my Mini later on... HA! Despite the snow, I have a super fun project to share with you as part of the May Arts Ribbonista Valentine's Blog Hop!


I have created some fun Valentine's pencils that are great for classroom treats to share with you today!

Valentine Dinosaurs

To create these, I first used Sally the Cricut to die cut the scalloped hearts from DCWV Glitter paper, and then cut the center hearts from white cardstock. I then stamped the dinosaurs (Paper Smooches cutness!) onto patterned paper and fussy cut them..because of the simple shapes, the dinosaurs were really easy to cut! I added some wiggle eyes to each dinosaur to make them just a bit more fun and then hand drew a line around each heart after adhering the patterned paper.

Valentine's Day Pencils (detail)

I then tied solid wrinkled ribbon and grosgrain ribbon around each pencil, in a bow, to finish them off...this was the PERFECT touch for these fun pencils! I love it!

This is such a fun project and a great alternative to more SUGAR! LOL! (Although, who am I kidding.. you all know I'm a BIG fan of sugar! HA!) I hope you give it a try!

The other Ribbonistas on today's hop are listed below! Be sure to visit them...and, if you are just joining us, head on over to the May Arts blog, because we have been having lots of hopping fun all week and there is ribbon to be won! YAYNESS!

Alexcia Patterson-Schroll
Montina Burt
Kendra Wiggins
• Jingle - You Are Here!
Monica Edwards

Have a Happy!!!

Jingle Out!

12.28.2012

Be Brave Bucket

Well, now there is a fun little title for ya! HA! So...here's the deal, just a quick post today. Honestly, I have that killer cold that's floating around, The Hubbums has had it for over a week and his is more borderline flu-ish and it simply will NOT go away! I'm hoping mine treats me nicer. HA! AND...Thatcher, the younger of our two labs, has a bit of a tummy bug, too, so she isn't feeling well, either. Basically, Maggie is the only healthy one in the house and apparently you can't do things like dishes and general holiday clean up if you don't have thumbs. At least, that's what she keeps telling me. HA!

BUT...I do have a fun little gift bucket to share with you today, so since I seem to be able to type at this point, I figured I'd show that to you! YAY!

Be Brave Gift Pail

I used some great woodgrain paper from the Crate Paper Peppermint Collection and stamped and embossed the Be Brave stamp from Unity's She Sprouted Wings stamp set. A bit of May Arts ribbon and some fabulous enamel dots from MME finished off the bucket for a great little gift container!

Be Brave Bucket (side)

I hope you had an absolutely delightful Christmas and I know I'm looking forward to New Year's Eve, as that is also our anniversary! YAY!!! Have a happy Friday, folks!!!

12.21.2012

Christmas and Candy! They go together like...

...well, like Christmas and candy, dude. For reals. Similes aren't really needed for this one. Just sayin'.

So...because they go together so well, it seemed the perfect office co-worker gift for Christmas! I was EXTRA nice and pulled out my Echo Park Winter Wishes paper pack. (That's good stuff, folks...for people who won't even know. *sigh* LOL!) I combined that with some fun washi tapes and great stamps from Unity!

Wrapped Candy Bars

I also made some cards for folks at work, but I did these for my department. Pretty fun stuff! I love Christmas and I love giving people little pieces of happy! YAY!

Wrapped Candy Bars

Wrapped Candy Bars

These were super fun to create! They would be great for stocking stuffers or other fun little treats, too!

MERRY CHRISTMAS!!!

12.18.2012

Ornaments Make GREAT Gift Toppers! {May Arts Ribbonista Blog Hop}

Welcome to Just Jingle!  If you are visiting from the May Arts Ribbonista Blog hop, I am so glad you are here!  If you are a regular..I'm SUPER so glad you are here!  :)  Love you guys!!!  Today I have a fun ornament tutorial for you using some fabulous ribbons!

Ribbon Ornaments


Aren't they fun!  And they aren't too tricky, either.  I love these because they make GREAT gift toppers along with a pretty ribbon or twine bow!  I began with some Layered Chipboard Ornaments from Coffee Break Designs.  I also used several of my favorite May Arts ribbons including the 1/8" Velvet in teal, yellow, and purple, the blue stripe twill, pink diagonal stripe, red metallic velvet, and silver metallic string.  I also used Lawn Fawn's Let it Snow set and Fa-La-La 6x6 paper pack.

DSCN9923


Begin by adhering the ribbon to the ornament base with Scor-Tape sheets.

DSCN9924

DSCN9925

Cover the front portion of the ornament with patterned paper and adhere over the ribbon covered background. Trim the ribbon after adhering the top.

DSCN9926

Stamp and emboss one tree per ornament. Cut out the trees and adhere to the front of the ornaments.

DSCN9927

Finish off your ornaments with a bit of the silver string and attach to gifts or hang from your own tree!

The hop lasts all week! To see the others posting today, check them out below! Don't forget to check out the May Arts blog each day this week for more inspiration and prizes, too! (The Ribbon Lady is ALL about prizes! ;))

Jingle
Karen
Kendra
Vera
Ashley

12.04.2012

Hanukkah Greetings and a Christmas Bucket o' Goodness

Creating fabulous cards and wonderfully presented gifts doesn't have to be hard!  Actually, it doesn't even have to take all that much time!  Today I have a simple Christmas gift and a pretty Hanukkah card to share with you.  Both of these projects are super simple and wonderfully festive, all at the same time!

Treat Bucket

I found this great treat bucket at Target in the $1 bin. And...because it was part of the previous season...it was 50% off. Yup. Totally. Love it when that happens! I stuffed it with a bag of Christmas candy and tied that off with a fabulous May Arts mesh ribbon bow. I then stamped a tag (punched with a great Fiskars ornament punch I've had for years and years) from the brand new PSA Essentials Peel and Stick tag collection, colored it, and attached it! Nice and easy!

Star of David Happy Holidays

As for my Hanukkah card, I used a great Bazzill shimmer paper as the base to give it a little sparkle with ZERO work. Then I stamped the Star of David from the PSA Essentials Mixed Holiday Peel and Stick pack and fussy cut them. This sounds time consuming, but due to the straight lines, it's actually super quick! I stamped the sentiment on a little banner and...voila! Nice and easy! LOVE.THAT.

For more PSA Essentials inspiration, check out the PSA Stamp Camp blog!

Also, I have a really great Christmas wreath going up over on the May Arts blog today! I've included the full tutorial so you can create this one, too. Be sure to stop by there to check it out! Here is a little sneak!

Ribbon Wreath Step 2

Oh...and for those wondering how court went yesterday... The guy didn't bother to show up, so that was certainly a point in our favor. We sat before the Magistrate and a detective and told them what had happened. The magistrate said he felt the charges should at the very least be bumped up from 'wanton destruction of property' to 'malicious destruction of property'. We don't know if there are other charges. It all seemed quite positive from our end, although, we won't hear anything for awhile. They did tell us that we WILL hear something, but due to the back logs and such, it will be a bit, so we are good with that. I'm just happy to have this piece done with. I never knew 20 minutes of sitting in a room describing an incident could be so VERY exhausting! LOL!

Jingle Out!

9.10.2012

It's Time To Start Thinking about Holiday Gifts! {Comment to Win}

Everyone loves getting those special gifts that someone made just for you. You know that the giver spent time thinking about you during the creative process, and these gifts, while often less expensive than their store bought brethren, are cherished forever by the recipients. Given pride of place on fireplace mantels and bedroom dressers, used frequently with love, each time this gift is enjoyed the recipient stops to think of the giver. These connections can't be bought at a mall, can't be selected with a gift card, can't be duplicated at all.

The Stampendous! Design Team is making gifts by hand this year, and we're forging those special ties with our loved ones this season.  Each day this week we'll bring you some clever and creative ideas for making some of your own gifts this year. We hope we inspire and delight you with these ideas. Saturday, the whole gang will be back with more inspiration and creativity in a super fun blog hop with prizes to be won!

Here is my project for today's kick of of Holiday Gift week using the super cute Cling Icing Fluffles and the Cling You're the Icing Sentiment stamp.  I have created a fun set of birthday cards to give.  Giving handmade cards in sets for others to give to friends and family is a fun way to use your creativity and let the gift keep on giving!


Cupcake Card Set


I began with a simple, but fun design using premade card bases by Recollections for Michael's.  I also used some premade tags to keep the process even quicker!  I stamped and colored my image, added a bit of floss and sparkle, and stamped and adhered the sentiment with foam tape on each card for a fun set of birthday cards!


Cupcake Birthday card


You're the Icing on the Cupcake Card Set


Today we also have four of our team sharing with you:


And of course there will be prizes!! Be sure to visit the blogs we list each day and comment on each one! We'll be drawing for some of our favorite stamps for gift giving!

9.06.2012

Back to School!

No.  I don't have pictures of adorable children holding up perfectly crafted signs indicating their newly current grade level.  However, yesterday WAS the first day back to school for The Hubbums, as he teaches middle school humanities.  I considered conning him into holding a cutely crafted sign and posing by the door, but somehow I don't think I would have won that battle.  HA!  I did, however, decide to make a card and give him a small gift when he got home from his first day.

Woodgrain World's Best Teacher


I created this card using the gorgeous Old School Appetizer set from Gourmet Rubber Stamps.  I really liked how easy it was to create a masculine teacher card using this set.  That can be hard sometimes.  I combined it with a woodgrain paper from American Crafts, some burlap string and a bit of twill from May Arts, and a button from American Crafts, as well.  I used Spellbinders Grand Circle Dies to cut the circle.  I love how the embossed line made it SUPER easy for me to add even stitches around the circle with my marker!  SO EASY!

Woodgrain World's Best Teacher (detail)


And...what do you give a middle school teacher as a first day back gift?  Well, a bottle of wine, of course!

First Day of School Gift


Trust me.  They need it.  Just say'n.

I hope you have a super fabulous day!

Jingle Out!

ShareThis