Showing posts with label moxie fab world. Show all posts

10.02.2014

Pots of Thanks

So, this is what happened.

Teri posted this awesome photo on Moxie Fab World as inspiration for a challenge. The Pretty Plants challenge, to be precise.


Jingle saw it. Loved it. Promptly forgot about it entirely.

Jingle is working in her studio and does a shout out looking for some good challenges to enter (that were open and would be long enough for me to post throughout this week).

Teri says, Hey! Check out this one!

Jingle is all... I TOTALLY saw that one and TOTALLY forgot all about it. I'm on it.

Then this happened.
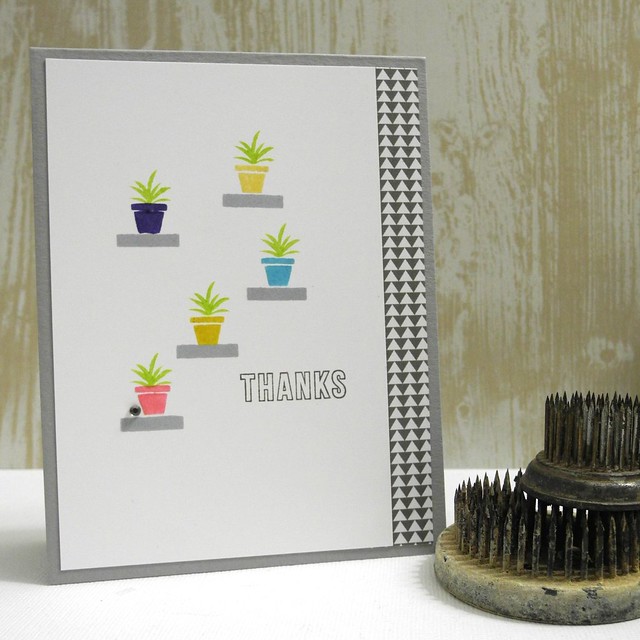
DSCN5431


Then Jingle was all... LOVE IT!

And that, my friends, is today's tale.

Have a Happy!

Supplies:
Stamps: Simon Says Stamp To Thine Own Shelf
Inks: Celebrations Hybrid Inks by Spellbinders
Patterned Paper: Avery Elle The Everyday Collection 6x6 Paper Pad
Cardstock: Simon Says Stamp Smoke, Crafter's Companion Ultra Smooth White Cardstock 

4.07.2014

Stencils and Custom Coloured Embossing Paste

Yes. Both of those things.  They are awesome. Super duper awesome. And I used both on this fun card...AND some watercoloring, too, just for grins and giggles.  WHAT?!!! Yup. Totes, peeps.  Totes.

I was feeling a strong urge to use some stencils based on the inspiration from both the Virginia's View Challenge and Moxie Fab World Styling With Stencils Challenge. Yup. Two challenges. It had to happen, folks. The Universe said so.

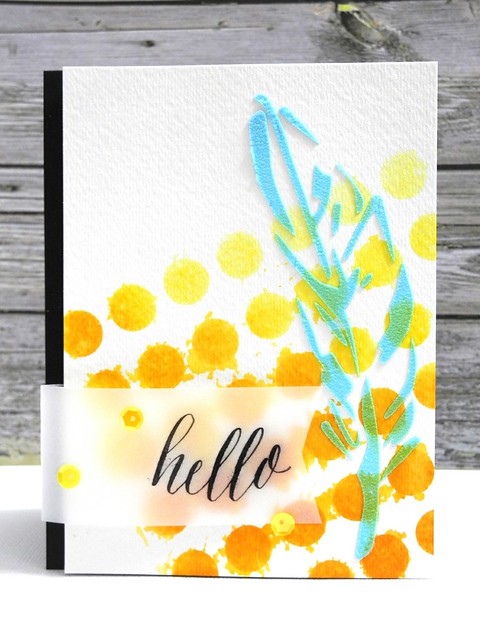
Blue Feather On Watercolor


Yup.  Blue embossing paste.  How did this come to be, you ask?  Well, let me tell you!  Take your Ranger craft mat... hit it a few times with your distress ink color of choice... fold just a *bit* of embossing paste right in that spot with a little spatula thingy (of COURSE that's the technical term) or an old gift card until the color has mixed in well.... smile because you totes just made your own custom embossing paste, YO!

Custom colored embossing paste?  Yup.  Loving this!


The background is done with watercolors through a stencil and then, after that dried I did the feather and finally stamped the hello, a fabulous Bossy Joscie stamp onto the vellum and attached that with foam pieces under the letters to hide them.  And sequins.  Always with the sequins.

Feather on Watercolor (detail)


You can check out my complete supply list in the links below.

Have a HAPPY!!!!!

An extra one, actually.  K?  K.  Thanks.  Happy.  Do it.


3.24.2014

Stencil Style

I was excited to see another great new challenge over at Moxie Fab World!  This one is all about the stencils!  Stencils were a funny thing for me.  I didn't think I'd use them very much, but I got one or two to give them a shot and was instantly addicted!  I love them!  You can really do so much with them and they are a fairly inexpensive took, particularly considering their versatility.  Simon Says Stamp has a huge selection to choose from, too!  YAY!

With All My Heart


For this card, I used a striped stencil and some Twinkling H2O's, a shimmery watercolor, to create a cool watercolor background.  I used a waterbrush to apply the paints and let them seep under the stencil a bit here and there.  I didn't go for 'perfect' I went more for cool and artsy and I really like how the colors blended and gave the card a neat look!

With All My Heart (detail)


In this one you can see the shimmer.  I love that!  It just adds a fun little touch to a card.  I stamped the sentiment from the Beautiful Words stamp set.  I love that set!  So pretty!  A little wood veneer heart finishes the sentiment and brings a nice natural touch to the card, as well.

So... that's my card for the Styling With Stencils in the Moxie Fab World challenge!  I may have a couple more before this one is all said and done.  I do so LOVE stencils!

Have a Happy!


12.13.2013

Let It Snow!!! (And a bit of Foxy Fab, too!)


This week we are celebrating SNOW over at CAS-ual Fridays Challenge!  That makes sense from here, as I guess we are expecting a bit of it over this weekend!  Our sponsor this week is Simon Says Stamp, so I decided to pull out some fun dies from Simon to create my card!

Season's Greetings


I die cut the snowflakes and stars from glitter paper and I love how the colors pop with the dark grey card base grounding the design.  And I like the sparkle.  I'm always a fan of sparkle.  For reals, folks.  For.  Reals.

Season's Greetings (detail)


Be sure to head on over to CAS-ual Fridays to link you YOUR snowy card!

In other news:  I am guest posting over at Moxie Fab World today!  I am SO honored and excited to be a guest for today, and I would absolutely LOVE if you would stop by and say hello!

Have a Happy!


11.09.2013

A Moxie Fab Thanks for a Moxie Fab Kinda Girl!


Today I write for Cath.  Today we write for Cath.  Today we put forth the most epic blog hop of all time.  The Moxie Fab Thanks Hop for Cath.  

If you came from Keren's blog, you have already begun!  If not, feel free to hop on back to the Moxie Fab World Blog for the complete list of bloggers participating in this amazing hop!  It's a long one, folks!

I took the time to write a few words on a post the other day, so today I will keep things concise.  Cath, you are amazing.  Your impact on me personally has been nothing less than HUGE.  Your impact on the crafting community is immeasurable.  You are a shining star, a beacon of inspiration.  To you, we owe great thanks.  To you, we owe Moxie Fab Gratitude.  I wish you nothing but WONDERFUL things ahead as your journey continues.  Please don't be a stranger.  P.S.  We totally need to do lunch.

Wishing You A Wonderful Everything

SUPPLIES:  Cardstock: (white) Crafter's Companion  Rubber Stamps: (frame and sentiment from Everything Wonderful set) Unity Stamp Compnay  Wood Plaque:  Unity Stamp Company  Watermarkk Ink:  (VersaMark) Tsukineko  Embossing Powder:  (white) Stampendous!  Silver String:  May Arts

INSTRUCTIONS:
1.  Create card base from card stock.  2.  Trim panel, dry emboss frame around edges.  3.  Stamp frame and sentiment on wood, heat emboss.  4.  Attach string to wood plaque, adhere to panel, attach string behind panel.  5.  Adhere panel to card with foam tape.

Wishing You a Wonderful Everything (detail)

Cath, Thank You.

The next stop on the hop is the incredible Debby Hughes!  Enjoy!

Have a Happy!


ShareThis