Showing posts with label tutorial. Show all posts

6.14.2015

Two Cards. Two Techniques. Two Tutorials

It's not TUESDAY, but it is TWOSDAY! hee-hee....see what I did there? *sigh* Okay, I will get on with it, I promise.

Here's the deal, I have TWO cards and TWO tutorials up today on different blogs. Each shows a different technique and I honestly think both are awesome and I hope you love them.

Gold Foil Awesome by Jennifer Ingle #justjingle #casualfridaysstamps #goldfoil #cards


This card is up over on the CAS-ual Fridays Stamps blog and I have a complete tutorial showing you how to get that distressed foil look! Hint: No fancy machines required! YAY! I'd love for you to stop by and check it out!
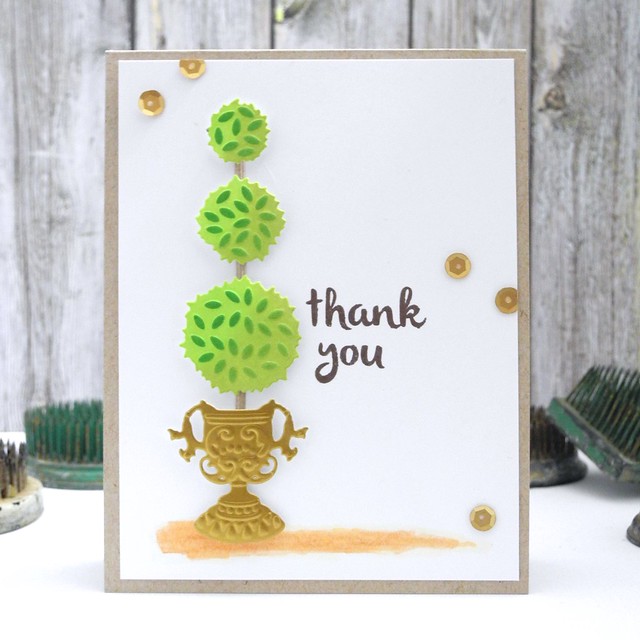
Topiary Thanks by Jennifer Ingle #justjingle #spellbinders #cards #diy


This card is up over on the Spellbinders blog and with this one I show you how to really get FULL mileage out of your Spellbinders dies by using them to cut, emboss, AND stencil to create a seriously fantastic finished look. LOVE IT!

So, basically, why are you still here? GO! Check out these tutorials! Share them with friends! Thanks and I love you all!

Have a Happy!

12.01.2014

Spellbinders® Winter Sneak Peek and GIVEAWAY! - Day 2


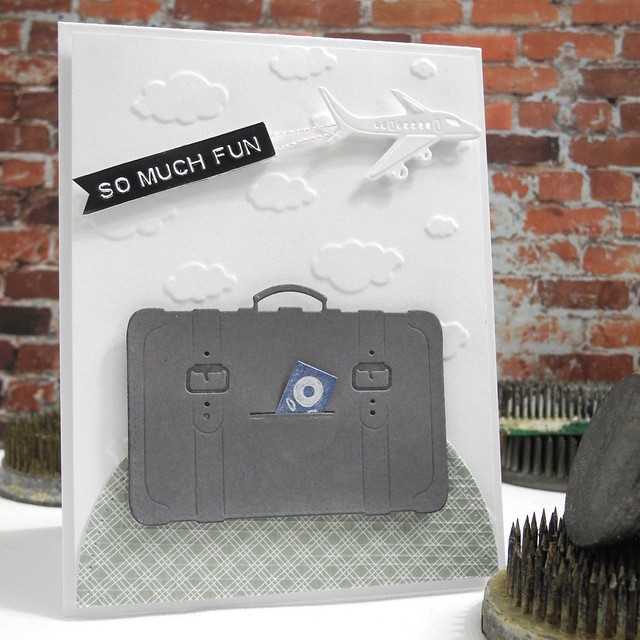
It is SNEAK PEEK time over at Spellbinders® and we are EXCITED! We have some AMAZING new releases coming out at CHA and I am excited to give you a quick peek at two of those great die sets today! The Around The World set and the International Luggage dies are SO MUCH FUN, you guys! For reals! I love these dies! They are great for CAS designs, Shabby Chic designs, vintage, layering...you name it! Seriously... they are super fabulous. For. Reals.

First, I am going to show you how I created this super fun card!

DSCN5944


Spellbinders® Supplies:
Cross Promotional Partner Supplies:
Other Supplies:
  • Ink: Blue Denim
  • Chipboard
Instructions:

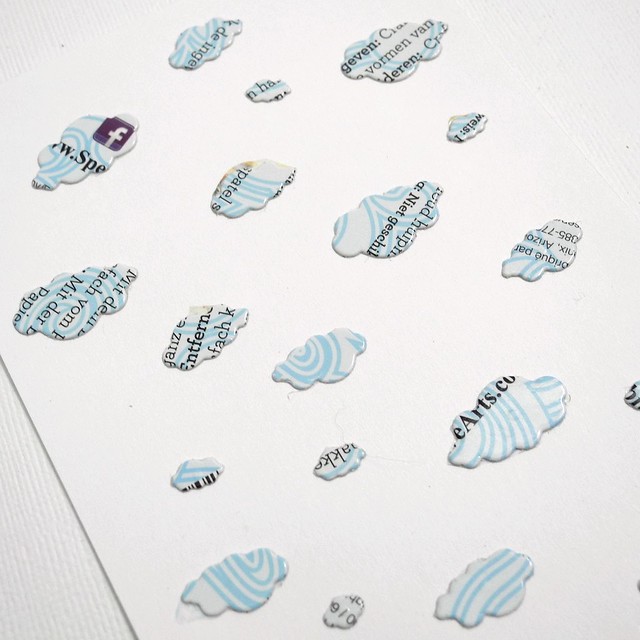
1. To create the cloud background on this card, I used dies to create an embossing plate. This is a super easy technique, that makes your dies even MORE versatile! LOVE THAT! To create the plate, cut a cardstock panel and then die cut the clouds repeatedly from chipboard (I used old product packaging for mine.) and adhere them to the cardstock panel.

Step 1


2. Create a sandwich in your die cut machine as you normally would for an embossing plate to emboss.

Step 2

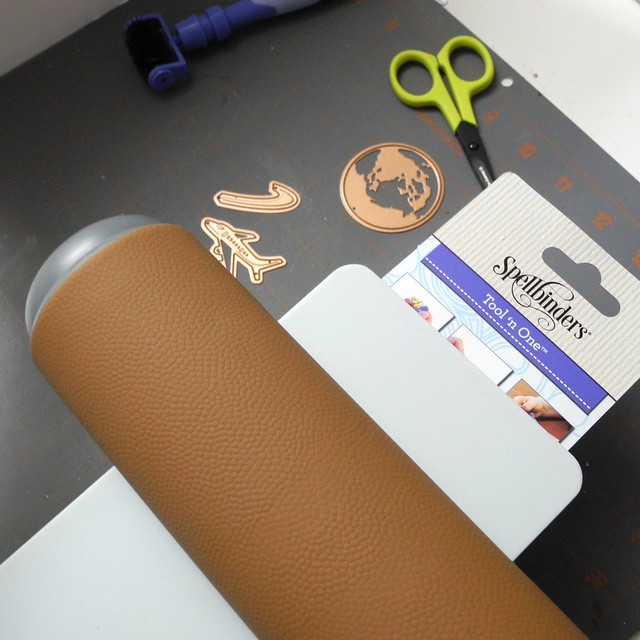
3. Die cut the suitcase, airplane, and passport. ink the passport and insert into suitcase 'pocket', adding adhesive where needed.

4. Die cut circle, using both the cut die and the piercing die, from the textured paper and adhere to embossed background.

Step 5


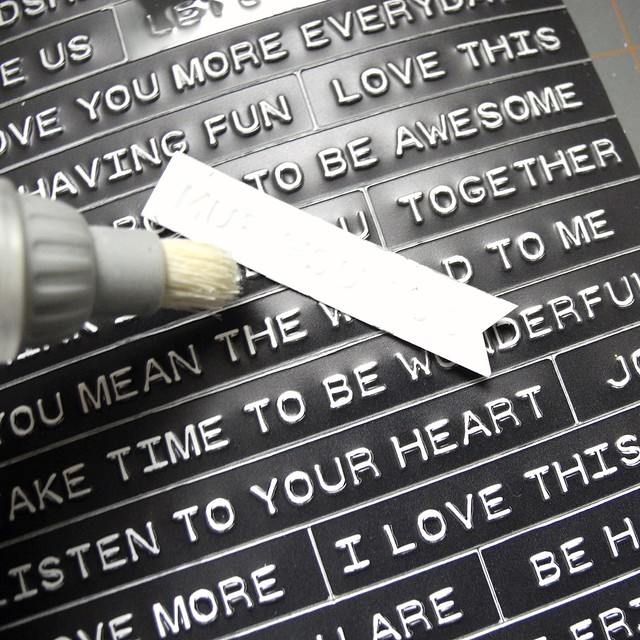
5. Brush powder or cornstarch to the back of sentiment sticker. Using foam tape, adhere string to sentiment and to airplane die cut. Adhere to card with the foam tape.

6. Adhere suitcase with passport to the panel using both a tape runner and foam tape as needed. Adhere panel to card base with foam tape.

I love how cute this card turned out and I can use my custom embossing plate again and again! It is always awesome to get the MOST out of supplies! LOVE IT!

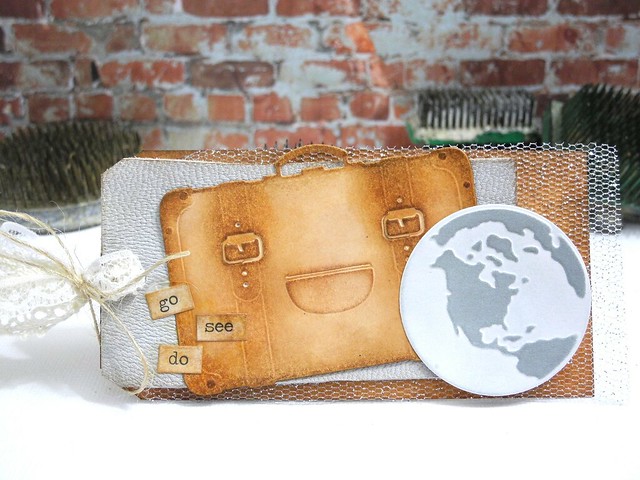
AND... to show you another direction you can go using these same die sets, I created this fun shabby chic luggage tag! LOTS of layers on this one! I used some basic tags along with leather and fabric pieces from the A Gilded Life line. If you haven't checked those out yet...dude... DO IT!

Go See Do Luggage Tag

GIVEAWAY TIME!

You have the chance to win some of the AMAZING new dies I used on my projects today! To enter, CLICK HERE and fill out the entry form. You can find the complete giveaway rules here

If you have any questions regarding the giveaway or our sneak peek week, you can contact Spellbinders® by email. No contest entries submitted via this email will be accepted. Please use the entry form only to enter the giveaway.

Be sure to head on over to the Spellbinders® Blog for more inspiration and details on our Winter Sneak Peek and Giveaway! Also, Linda Duke is sharing another FABULOUS project on her blog today, so be sure to head over there, as well!

Have a Happy!


2.10.2014

Have Fun!

This month the challenge over at Crafter's Companion is to create CAS cards.   Ummm... yup.  I've totally got this one!  *insert silly wink here*

For my inspiration card I decided to go ahead and take some step shots to give you a tutorial on how I colored my images.  Even on a CAS card, you can make a big statement with some fun coloring!  Now, before I begin, I DO want to point out that I am certainly not one to consider myself an expert.  As a matter of fact, I sorta figured I'd never do a tutorial on coloring because there are many folks much better at it than I am, however, after seeing how this turned out, I realized that it really can be simple to get a great look and I thought it wouldn't be fair not to share how easy it is!  So... that being said... yes... even YOU can color!  I promise!

Have Fun


I really love how the bottles turned out, so I am excted to share how I acheived this look!

Step 1


I began by stamping the beer bottles from the Camden Town Male 1 set onto my card with Momento Tuxedo Black ink.  I used a t-square to line them up.  I then colored all but one of the bottles using Spectrum Noir GB8.  I skipped the labels, knowing I wanted to do those in a different color further down the line.  As you can see, I missed the lines a bit, however, my blender pen cleaned that up for me quite nicely after the fact!  LOVE THAT!!!

Step 2


Next, I went in with GB10 to darken the bottles and add the look of light hitting them.  As it turns out, light doesn't always make perfectly straight lines, so this isn't the cleanest coloring you will ever do, but it gives a really nice looking finish.

Step 3

To finish the bottles, I went in with EB5, the darkest brown I used, and added just a touch to the outer edges.  These are not solid lines, but more 'dashes' of color.  I then finished the bottles by going over the entire colored area with my blender pen.  I love the texture that the blender adds when used in this manner.

I then colored the green bottle, using the same method, only in greens.  I used CG1, CG2, and DG3 for the green.

Step 3


I then did the labels on the brown bottles in reds, using CR10 as my light, DR5 as my medium, and  DR6 as the dark.  For the yellow label, I used CT2, CT4, and GB5.  I went over these with a blender, as well.

Step 5


Finally, I finished off the caps by coloring them with a silver pen from Faber Castell.  I wanted a touch of metallic color for those!  I then simply stamped the sentiment, matted the panel, and adhere it to the card base!  Super easy and a way fun card!

Have Fun


Have a Happy!!!


12.28.2013

Merry Christmas and a Happy New Year!

I have my final post as an Artist in Residence for Imagine Crafts/Tsukineko up on the Imagine Crafts blog today!  I hope you will stop by and check out my tutorial for this pretty in-between-holidays card!

And Happy New Year

Have a Happy!

9.28.2013

Be Merry!

Hello, friends! I'm here with another fun IMAGINE Crafts®/Tsukineko® tutorial for you today! We partnered up with the amazing Stampendous! this month, and, well, to say I'm a Stampendous! fan is a bit of an understatement, really. Just sayin'. *wink* *wink* Here is the card I am going to be sharing with you today.

Be Merry

Isn't that fun?!!! I am particularly excited because it not only uses great inks from IMAGINE Crafts®/Tsukineko®, but it also uses both stamps AND stencils from Stampendous! The Stampendous! jumbos now come with a free stencil and I am ALL over that! I love it!

Here are the supplies you will need:

IMAGINE Crafts®/Tsukineko® VersaMark™ Watermark Ink
IMAGINE Crafts®/Tsukineko® VersaMagic™ Chalk Pigment Ink in Red Magic
IMAGINE Crafts® InkBlushers™
IMAGINE Crafts® Embossing Powder™
Stampendous! Cling Jumbo Dear Santa set
Simon Says Stamp Mod Tree Die
Enamel Dots
May Arts Red Grosgrain
SRM Stickers Border Stickers
White cardstock card base

Be Merry Step 1

Step 1. Stamp the word border stamp with IMAGINE Crafts®/Tsukineko® VersaMark™ Watermark Ink and heat emboss with IMAGINE Crafts® Embossing Powder™ on the white card base.

Be Merry Step 2

Step 2. Place the stencil over the stamped and embossed area and secure in place with repositionable tape. Use the IMAGINE Crafts® InkBlushers™ to apply Red Magic VersaMagic ink to the stencil areas.

Be Merry Step 3

Step 3. Adhere ribbon to the edges of the stenciled/stamped area and affix border stickers.

Be Merry Step 4

Step 4. Die cut tree and adhere to card. Affix enamel dots.

And that's how you create this fun holiday card!

Have a Happy!

6.20.2013

Stamping on Vellum, Anyone?

Hiya!  I am SUPER excited, as this is my first tutorial post as an Artist in Residence with IMAGINE Crafts®/Tsukineko® Woot! Woot! I have a fun card to share with you today using
the IMAGINE Crafts®/Tsukineko® Brilliance™ Pigment Ink on vellum.  I LOVE how these inks stamp on vellum!  It's brilliant, really.  Simply brilliant.  Just sayin'.


DSCN1692

Supplies:
IMAGINE Crafts®/Tsukineko® Brilliance™ Pigment Ink in Pearlescent Sky Blue,
Rocket Red, and Mediterranean Blue
Vellum and Woodgrain cardstock from Simon Says Stamp
Wood Veneer Sentiment from Lawn Fawn

Begin by stamping the banner three times, overlapping them slightly onto the vellum with the Brilliance Pigment Inks. I love how cleanly these inks stamp on vellum!

DSCN1688

Trim around the banners.

DSCN1689

Adhere the vellum banner cutout to a card base made from the woodgrain cardstock with
foam tape.

DSCN1690

Adhere the wood veneer directly to the vellum to finish off the card.

DSCN1691

And here it is!

Hello

I hope you have enjoyed this fun little tutorial!  I look forward to sharing more Imagine Crafts/Tsukineko goodness with you!  YAY!

Have a Happy!


12.04.2012

Hanukkah Greetings and a Christmas Bucket o' Goodness

Creating fabulous cards and wonderfully presented gifts doesn't have to be hard!  Actually, it doesn't even have to take all that much time!  Today I have a simple Christmas gift and a pretty Hanukkah card to share with you.  Both of these projects are super simple and wonderfully festive, all at the same time!

Treat Bucket

I found this great treat bucket at Target in the $1 bin. And...because it was part of the previous season...it was 50% off. Yup. Totally. Love it when that happens! I stuffed it with a bag of Christmas candy and tied that off with a fabulous May Arts mesh ribbon bow. I then stamped a tag (punched with a great Fiskars ornament punch I've had for years and years) from the brand new PSA Essentials Peel and Stick tag collection, colored it, and attached it! Nice and easy!

Star of David Happy Holidays

As for my Hanukkah card, I used a great Bazzill shimmer paper as the base to give it a little sparkle with ZERO work. Then I stamped the Star of David from the PSA Essentials Mixed Holiday Peel and Stick pack and fussy cut them. This sounds time consuming, but due to the straight lines, it's actually super quick! I stamped the sentiment on a little banner and...voila! Nice and easy! LOVE.THAT.

For more PSA Essentials inspiration, check out the PSA Stamp Camp blog!

Also, I have a really great Christmas wreath going up over on the May Arts blog today! I've included the full tutorial so you can create this one, too. Be sure to stop by there to check it out! Here is a little sneak!

Ribbon Wreath Step 2

Oh...and for those wondering how court went yesterday... The guy didn't bother to show up, so that was certainly a point in our favor. We sat before the Magistrate and a detective and told them what had happened. The magistrate said he felt the charges should at the very least be bumped up from 'wanton destruction of property' to 'malicious destruction of property'. We don't know if there are other charges. It all seemed quite positive from our end, although, we won't hear anything for awhile. They did tell us that we WILL hear something, but due to the back logs and such, it will be a bit, so we are good with that. I'm just happy to have this piece done with. I never knew 20 minutes of sitting in a room describing an incident could be so VERY exhausting! LOL!

Jingle Out!

10.29.2009

Tutorial: My Gnomescape: Cosmo Cricket and Pink Persimmon Make Me Happy


This.
Is my Gnomescape.
What is a Gnomescape, you ask? A Gnomescape is a happy little 3-dimensional gnome home created by MEEEEEEE!!!! And it happens to be on the list of cutest things EVER! Today, I am going to share with you how to make a Gnomescape like mine (or a similar type of shadowbox piece if you happen to not be into gnomes and mushrooms and such. Although, I'm not sure why you wouldn't be into those things because they are pretty much just GREAT!!!!)

Here is what you will need. Cosmo Cricket Earth Love collection (LOVE is RIGHT!!!), Pink Persimmon Ribit Stamp set, Nikoart gnome stamp, a 6x6 shadow box frame (mine is Jolee's by EK Success), various inks and applicators, a sheet of vintage book paper, a chipboard house, colored pencils and/or markers, some glittery stuff, adhesives, and some wire. That should pretty much cover everything.

Begin by cutting your background paper to the correct size to fit the back of your frame. Mine was not quite 6x6, so be sure to use the backboard as a guide. Ink the edges (you will be doing a lot of this).

Stamp your images onto cardstock. I usually stamp a few of each that I want to use just in case I don't like the coloring the first time around. I think I colored 3 of that large mushroom before I was happy with it! LOL!


Cut out the images that you plan to use in your scene. Be sure to leave the black ink line when you cut out your images so that they really pop when layered onto the background.

Cut two more layers to add to your background. I used the bird paper in the middle and then used the rolling paper for the 'ground' in my scene. I simply used the patterns on the paper to guide my cutting. Adhere with multiple layers of foam adhesive. Note: If layering onto different levels your adhesive may have to be different thicknesses on the top and bottom - be sure to watch for this so you keep it all even.

Cover the chipboard house with the vintage text paper. Assemble the elements onto the background as you want them.

Be sure to add your elements at a variety of depths to give your piece a lot of dimension.

For the very bottom of the frame I wanted to add something that looked fantastical, but also added some fun to my piece. I chose to cut a strip of cardstock to fit the bottom of the frame and cover that with a shimmer flake. I spritzed it with some Glimmer Mist to change the color a bit and added a few pearl beads, as well. I then adhered the strip to the frame.

Because this is such a dimensional piece, it only seemed right to have something hanging in my shadow box. I cut these fun flowers from the Earth Love papers out to dangle from the top.

To adhere them, simply add a glue dot to the back of the flower and attach a piece of wire. Coil the top of the wire (the part not glued to the flower) and use a glue dot to stick that to a circle of cardstock (I chose to use the center of more flowers to keep them decorative) and then adhere to the top of the frame at various depths. Trim off any excess wire.

Once you have everything in place all you need to do is assemble your frame and hang! I love this thing! It was TONS of fun to create and even more fun to have in my studio! It makes me SOOOO happy!!!!


What do you think? It's totally a happy-making kind of project! Really! I promise! It is! You could totally make these as gifts! And...it actually doesn't take all that long. I know it looks like it would take forever, but it really doesn't!

***Also, don't forget to check out the giveaway posted above!

ShareThis