Hello, everyone! So, I got some time tonight and I was so excited about what I made that I decided to write up a fun tutorial for you! These are super easy and way fun to make! I sort of channeled a couple of sources for this one, so I'm not in any way claiming that these are my original idea or anything....I'm just excited about them!
Coffee Filter Flowers with Glimmer Mist
Supplies:
3 Cone Coffee Filters
1 pair of pinked edge scissors
1 pair of traditional scissors
Glimmer Mist (or Maya Mist or similar product)
Ink in a couple of coordinating colors
Super Tape
Vintage Button (or a center of some kind)
Step 1: Open the first coffee filter and squish into a round shape.

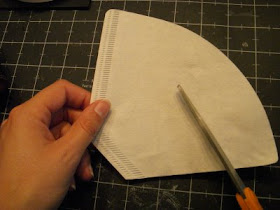
Step 2: Cut the second filter about an inch and a half down with the pinked scissors.

Step 3: Cut the third filter about half way down with traditional scissors. (You may choose to pink this edge as well, but I liked the straight line. It's totally up to you.)

step 4: Crunch all of the filters down into the circle shape like the first.

Step 5: In a controlled environment spray all three scrunched circles with a glimmer spray.

Step 6: Use a heat gun to dry the pieces after misting them. Be sure to keep the gun at a safe distance as this is thinner than regular paper. If you do not have a heat gun, you can wait for them to dry. I don't have patience, but I DO have a heat gun!!!

Step 7: Go all Tim Holtz on these suckers and ink up those folds! Use a couple of colors to really get a lot of dimension.

Step 8: For this step we are going to channel the fabulous Donna Salazar. Layer your three pieces and then from the back pinch the center, twist slightly, and fold. Use a piece of Super Tape to secure.


Step 9: Flip your flower back over so that it is right side up. Take out your wicked crazy awesome "Head of Christ" Parchment Notes box and choose a super-fantastic vintage button to go in the center.
....WHAT? You don't have an awesome "Head of Christ" Parchment Notes box filled with vintage buttons? Oh. For that I am very sorry. You can use whatever it is that you have. You will just have to be a little sad that your box is not as cool as mine. Hee-Hee. I do so LOVE that box!

Step 10: Attach your button with Super Tape and add your flower to some amazing project that you are working on!

Fair Warning: These are addictive.
Fair Warning #2: While this looks like it would be WAY cute on a headband...if it rains you are pretty much fracked, so I would suggest INSIDE projects only. Just say'n. Unless you like the 'glimmer mist running down my face' look. In which case...by all means...go for it!
Make some flowers! Please let me know what you think of this tutorial in the comments section! Thanks!!!


They look great!! The tutorial was easy to follow. I feel like I could do it:-)
ReplyDeleteThat's a cool project, and I can see them gracing many a package, or strung together in a garland.
ReplyDeleteI love the Head of Christ box! So weird...
okay seriously, how cute are YOU!?!??! I love the coffee filter tutorial, although it made me start craving cinnamon buns strangely enough. lol :)
ReplyDeleteI'll top your Head of Christ box, my last vintage buttons were in a non descript container...but Ralph while visiting ate the corner out of it;-)
ReplyDeletefracked = new word to add to my vocabulary
Thanks for the tutorial!
Love the flowers and your head of Christ box cracked me up.
ReplyDeletegreat idea my lovely lady!! Really looks great-will have to try that one me thinks!! Fracked not quite up to par on this word, couldn't find it in a dictionary-what I did find made me blush!!!
ReplyDeleteLove Kathie
xoxo
This flower looks easy peasy to make AND it's adorable! I like that combo!
ReplyDeleteVery cute! I will be checking more of your blog out. I love little crafty sites!
ReplyDeleteYou were above me in Roll Call this morning, so I thought I would share some love!
thanks for the tutorial. I'll have to give it a try.
ReplyDeleteGreat idea for a summer project. I have a 5 year old daughter who'll be at home for two months for the school summer vacation!
ReplyDeleteI don't ever want to be "fracked" it sounds bad.... very bad! I love, love the flower... thanks for the "wicked" tutorial! ;)
ReplyDeleteVery cool! Thanks for sharing that with us and I am bummed I don't have a button box like you! LOL! I am glad you posted a picture because I wasn't sure what your were talking about, LOL! :)
ReplyDeleteThose turned out totally cute! What a fun/easy/inexpensive little craft! Love it. :)
ReplyDelete♥ xtine
http://www.stuffbyxtine.com
I love this! What a great idea, and so vintagy! This is perfect for a challenge I want to do, making my own embellishment, being a focal point! Thanks for sharing!
ReplyDeleteI was seriously laughing at the Head of Christ box. How is it that I don't have one of those?
ReplyDeleteGreat tutorial!
I haven't tried the glimmer mist, but I've been wanting to.
ReplyDeleteGreat idea! I wish I was more crafty! I seriously have an uncanny ability to ruin things though! Oh, and this is kind of strange but I noticed your ring in the pics and it's beautiful! I know, I'm random, but I have to say it!
ReplyDelete